This is a real case study and an MBA in how to renovate homes the correct way.
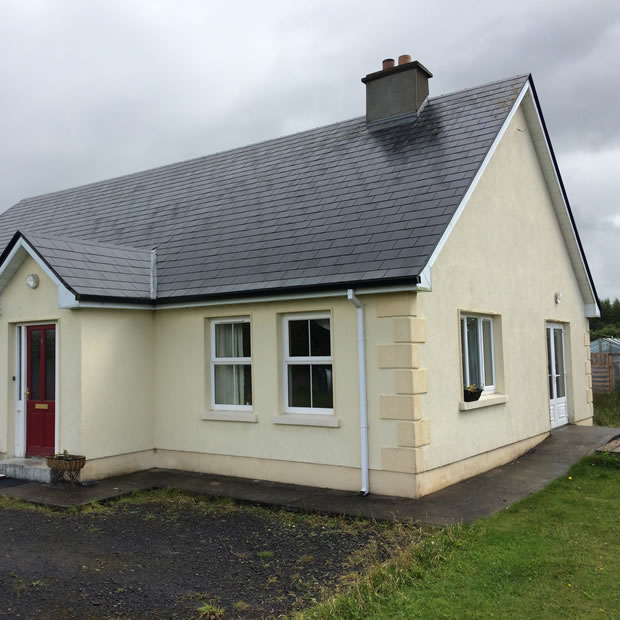
Renovating a home is easy once you know what to do. (The picture above is the “actual house” that was upgraded)
This home is a typical detached house, planning permission 2006, finished in 2008, which means it was exempt from Part L regulations, so it is typical of any house built from the 1960s onwards. It has a cavity wall concrete block construction of 100mm/100mm/100mm and oil-fired central heating.
(This post will be highly technical, with associated documentation showing each step along the journey. You will be surprised at how easy it is to fix an older home and get an excellent energy rating with HONE. But also bringing high levels of comfort into the building. Still, we will tell you ALL the things you need to do and educate you on all the other elements we don’t offer solutions to. Future-proofing your home will not be achieved with one step alone.)
This is in Ireland and applies to the UK as the energy rating systems are the same, but these principles can be applied in any country.
When renovating a home, the homeowner wants the least disruption (fast work), the lowest future energy bills and the most future-proofing possible. So do it once and do it right. But, of course, the best value for money.
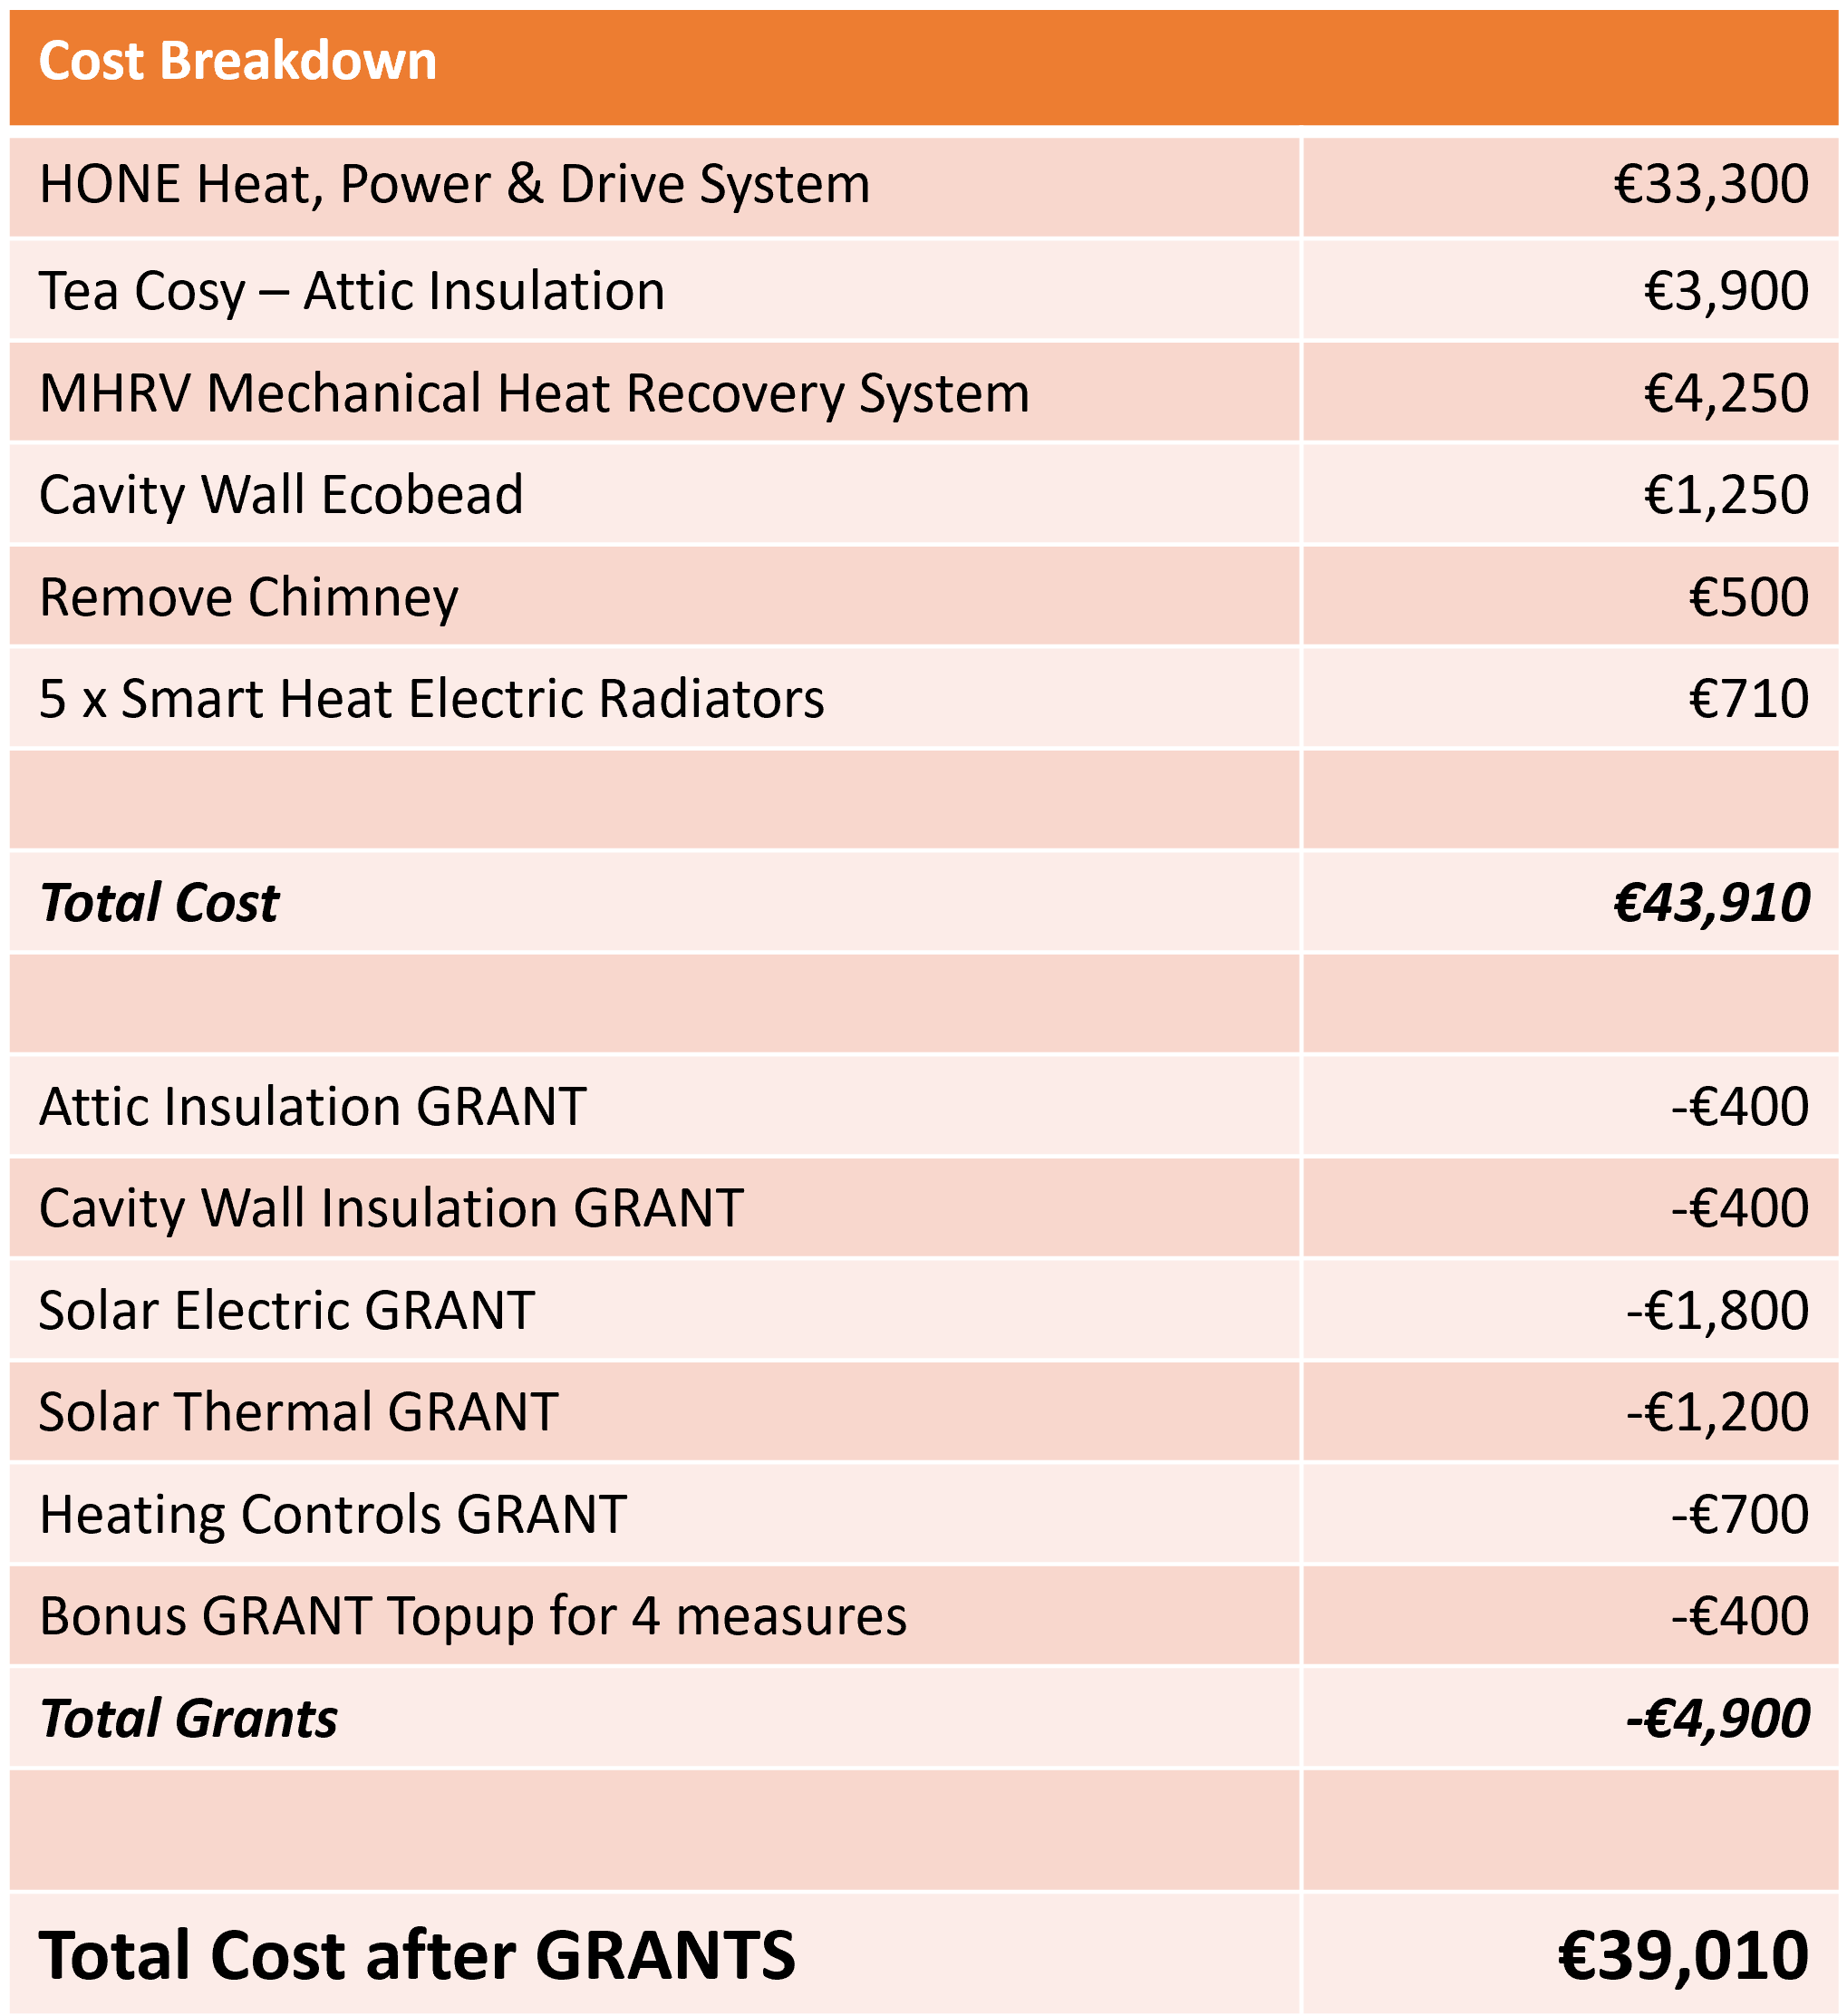
The total renovation time for this project from E1 to A2 was 5 days. We will discuss the costs in the end summary.
Most deep retrofits require you to move out of the home for anything from 6 weeks to 3 months. With the upgrade path detailed here, you will have little disruption to your daily lives.
No matter where you are in the world, the government wants you to install electric heating to transfer their fossil fuel taxation over to the grid. This is what you must avoid; they will offer thousands in grants and supports to trap you into an energy purchasing future. We will show you how to avoid it in this case study.
In the Government’s view of the world, you will still be buying 100% of your heating, hot water, electricity, including all the electricity for charging your electric car long into the future.
Our view of the world is that you should make most of your heating, hot water, electricity, including electric car charging for free from your own clean, renewable energy systems and keep your money for your own use.
STARTING POINT.
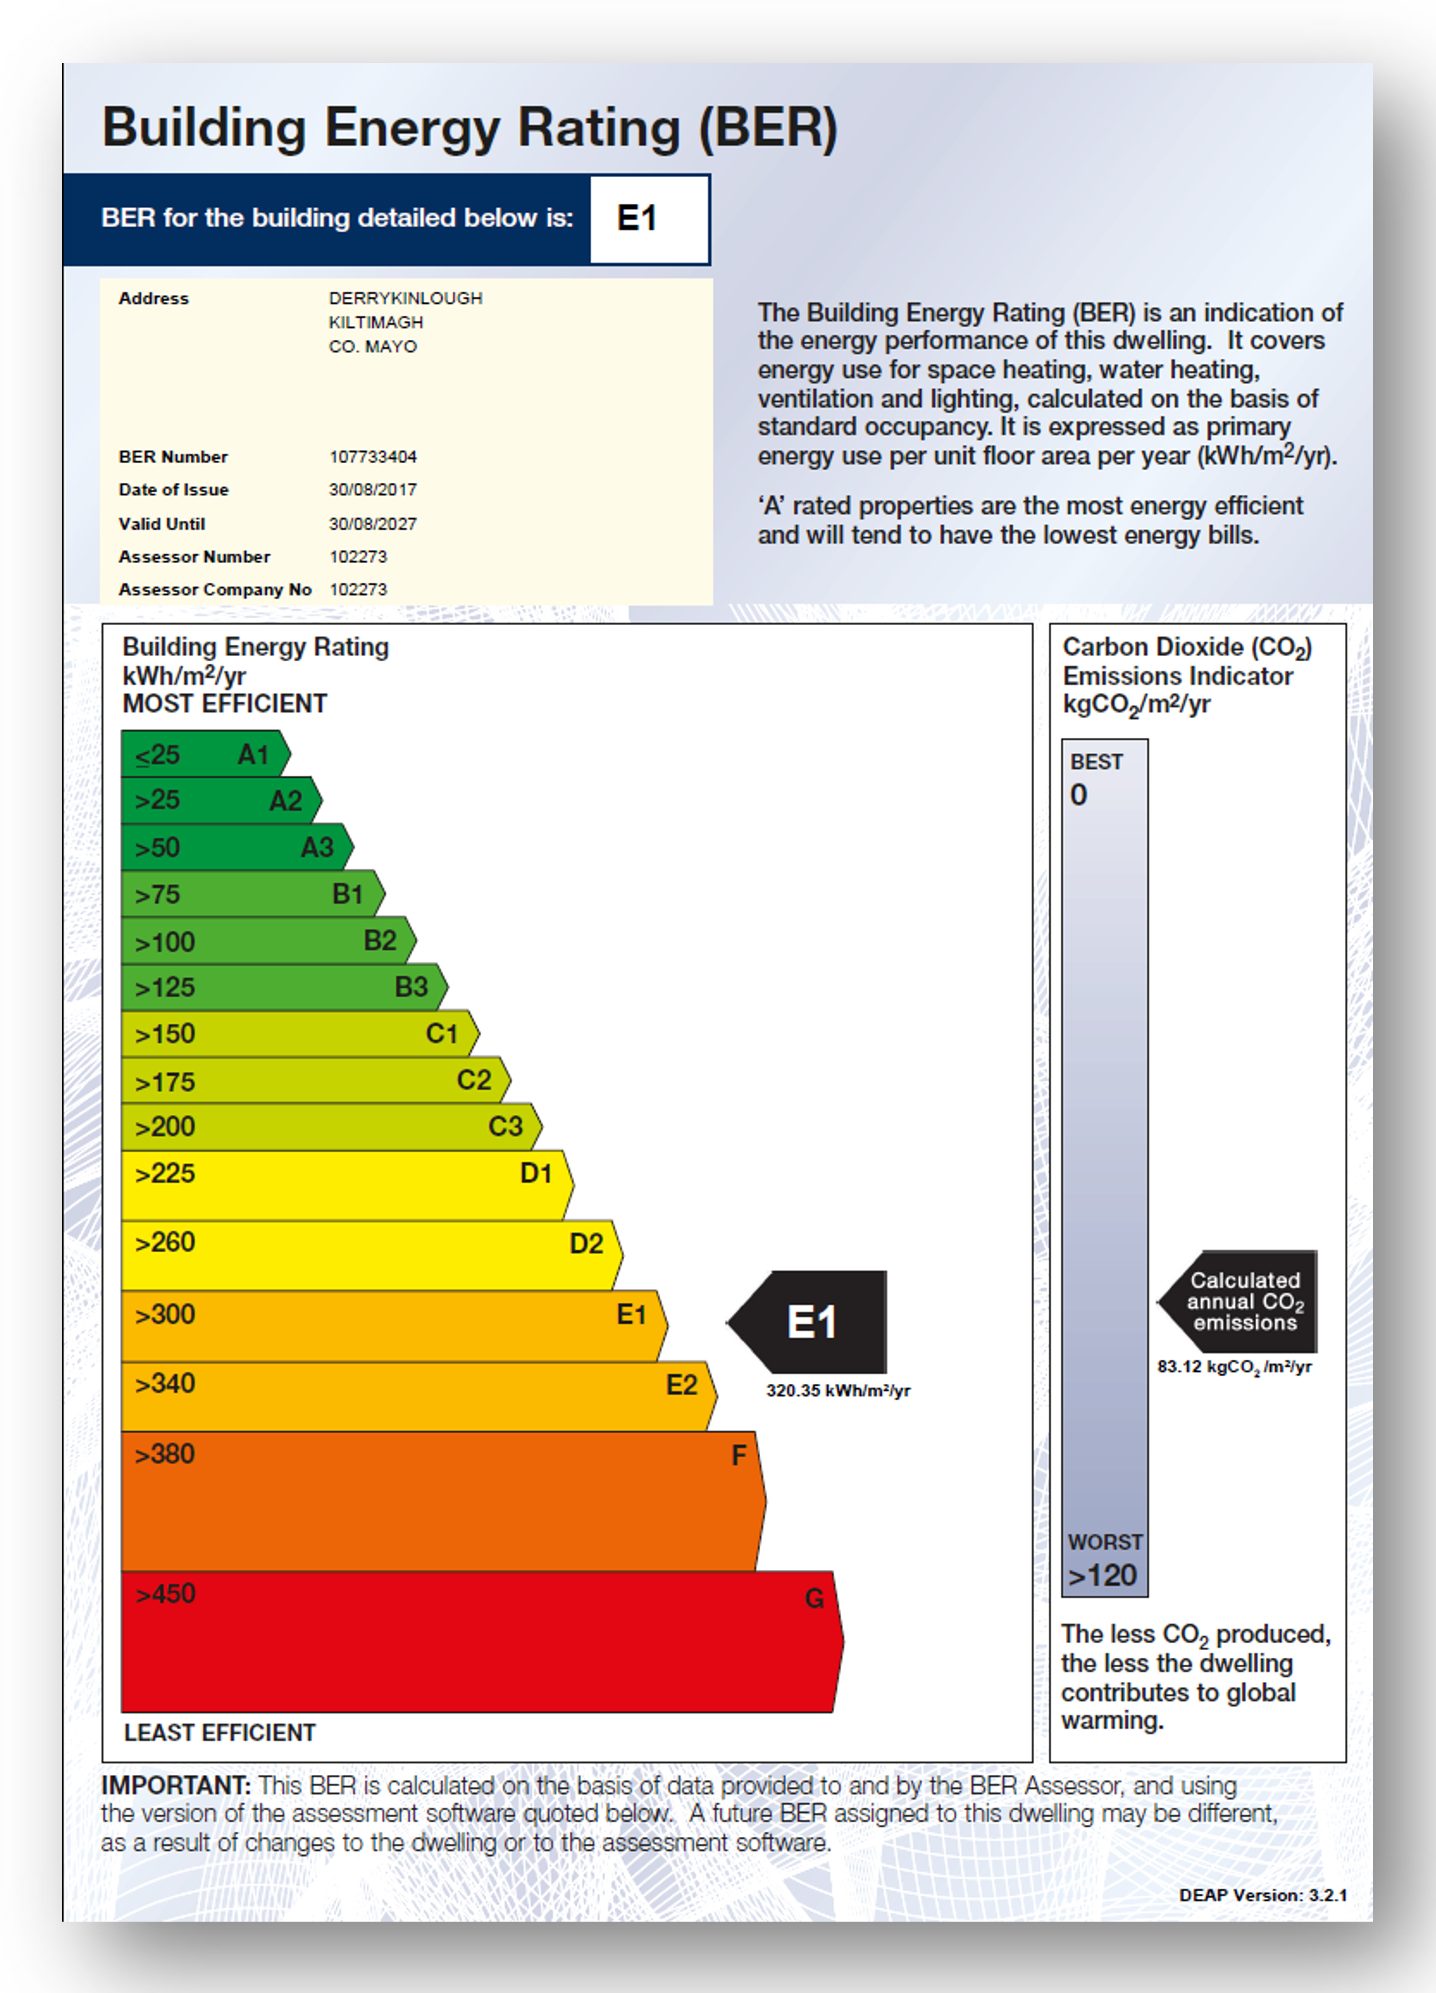
The starting point is getting a BER (Energy Rating completed on the home); this was an E1 rating and was completed in SEAI DEAP version 3.x.x; this has been recreated in version 4.x.x as this is now the current SEAI energy rating platform. While no building regulations (Part L – energy) apply to this house as its planning pre-dates these regulations, we will turn on the full nZEB regulations in the energy rating software to see how close the home is to meet these new 2021 regulations during the upgrade. You can view the Part L Report for each step along the journey.
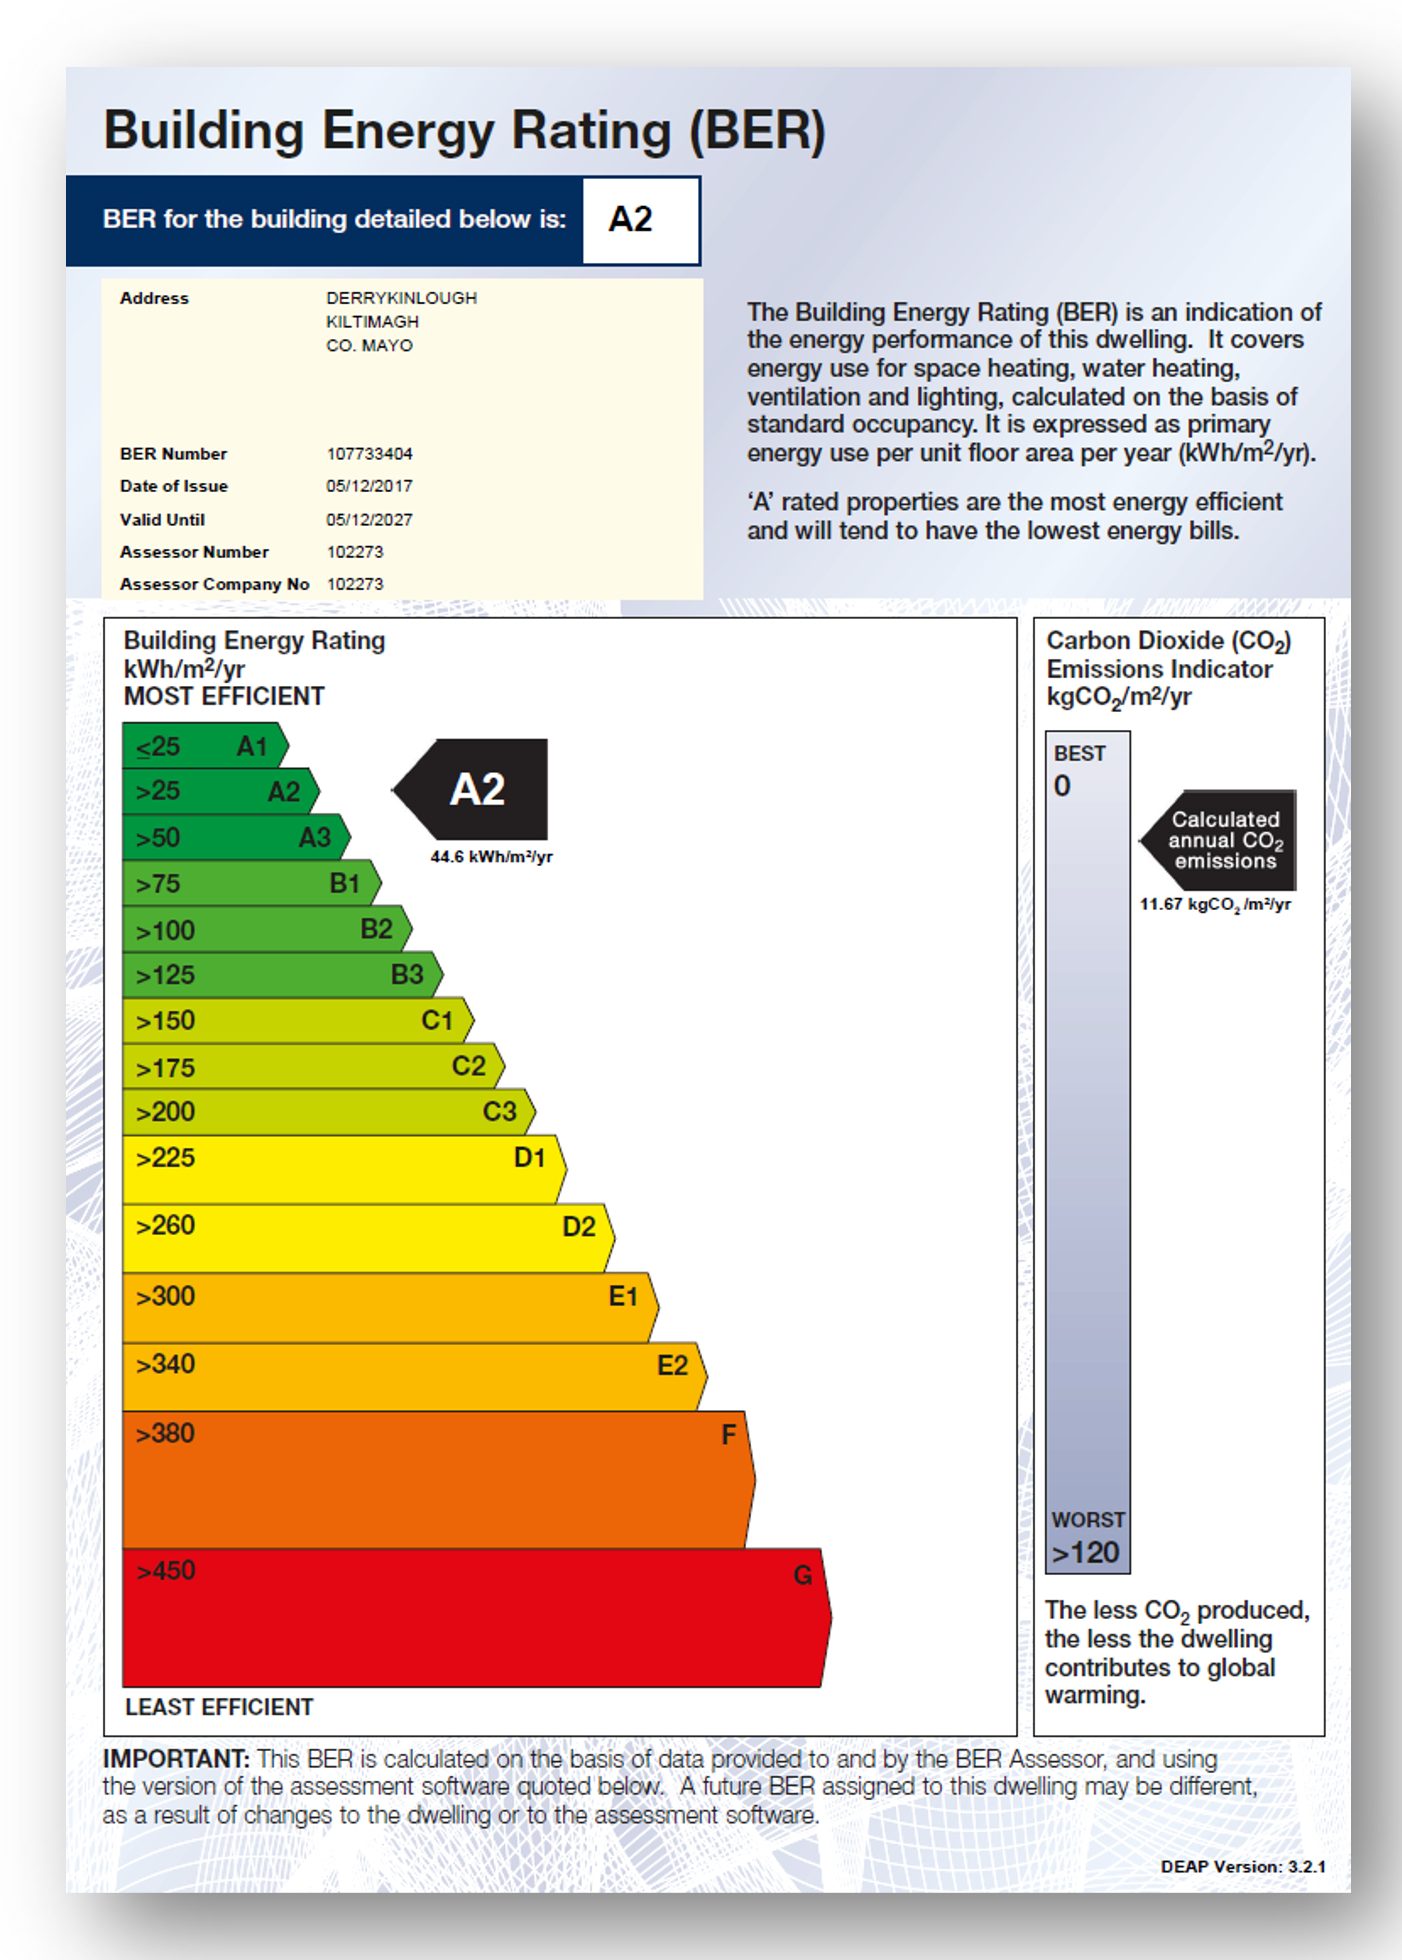
This is the original energy rating certificate at the starting point.
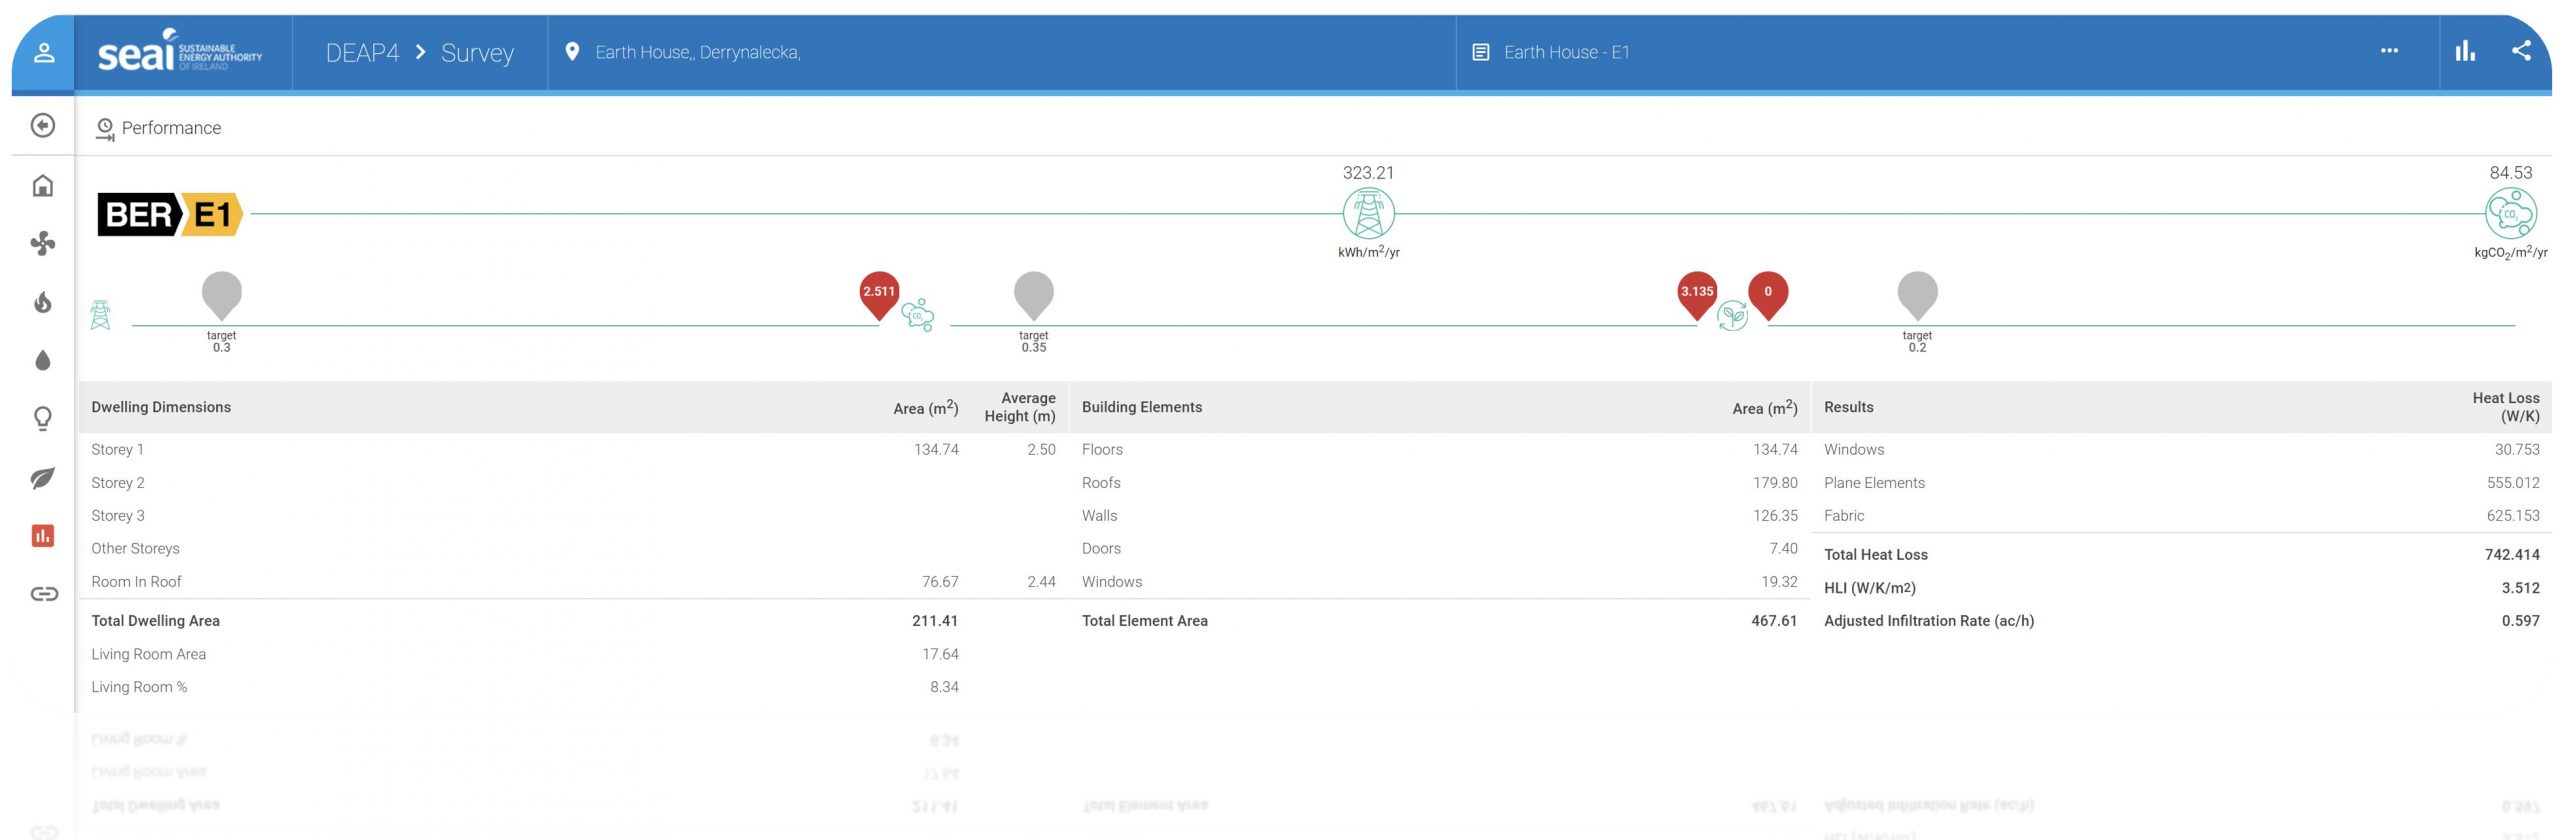
This is the full dwelling report at the start of the project as an E1. (recreated in version 4.x.x.)
E1-renovation-dwelling-report
Here is the Part L report; while this house is not subject to these rules, we will see how it performs as it gets upgraded. (recreated in version 4.x.x.)
E1-renovation-part-l-report
Starting Point DEAP Result

- E1 Energy Rating
- Primary Energy = 323.21 kWh/year
- CO2 Emissions = 84.53 kgCO2/year
- EPC = 2.511
- CPC = 3.135
- RER = 0%
It should be noted that this home upgrade also included a full attic conversion, so you will see the “room in roof” convert to a “second floor” in DEAP. The works listed in this case study would NOT have changed if the attic was not converted. (It is important to note that)
STEP 1. Cavity Wall Insulation.
This house should have a 40 mm aeroboard in the 100mm cavity as per building regulations in force when the house was built, but the cavity was empty on inspection. Whilst this shouldn’t be the case, it turns out to be a positive as the entire cavity can be pumped with Ecobead, which gets a better U Value than 40 mm Aeroboard/Ecobead mix. This insulation upgrade is done externally, so no inconvenience to the household and the work takes half a day.
The product used here was Kingspan Ecobead, and this bead has PVA bonding, so while it flows into the cavity as a loose bead, it cures and forms rigid insulation.
Here is the updated DEAP dwelling report after step 1.
Cavity Wall-dwelling-reportHere is the corresponding Part L report after step 1.
Cavity Wall-part-l-report
Step 1 DEAP Result
- E1 Energy Rating
- Primary Energy = 318.52 kWh/year
- CO2 Emissions = 83.28 kgCO2/year
- EPC = 2.475
- CPC = 3.089
- RER = 0%
This is the new rating after going from zero cavity wall insulation to a fully insulated cavity. This result shocks most people in that minimal benefit is acquired in your energy rating from upgrading your wall insulation; it is virtually the same BER result as before. Why this happens is to do with the fact that heat goes upwards, not sideways, so the software limits the benefit. However, you should give your walls a minimum amount of insulation, such as pumping the cavity as it slows down the cooling of your house overnight in winter and the NEXT morning; your house will have more comfort than before.
Before you go spending thousands on external wall insulation or large internal insulated backed plasterboard projects, test everything you plan to do in DEAP first, as you may be spending your money in the wrong place.
STEP 2. Air Tightness.
You may ask why airtightness is considered before attic insulation. This home already has basic attic insulation of 150mm. If you apply a big attic insulation upgrade before ventilation, you will create major condensation and mould issues, and this is an outcome of insulating without ventilating. In addition, you will have to open your windows more, especially in winter. This will make your house colder.
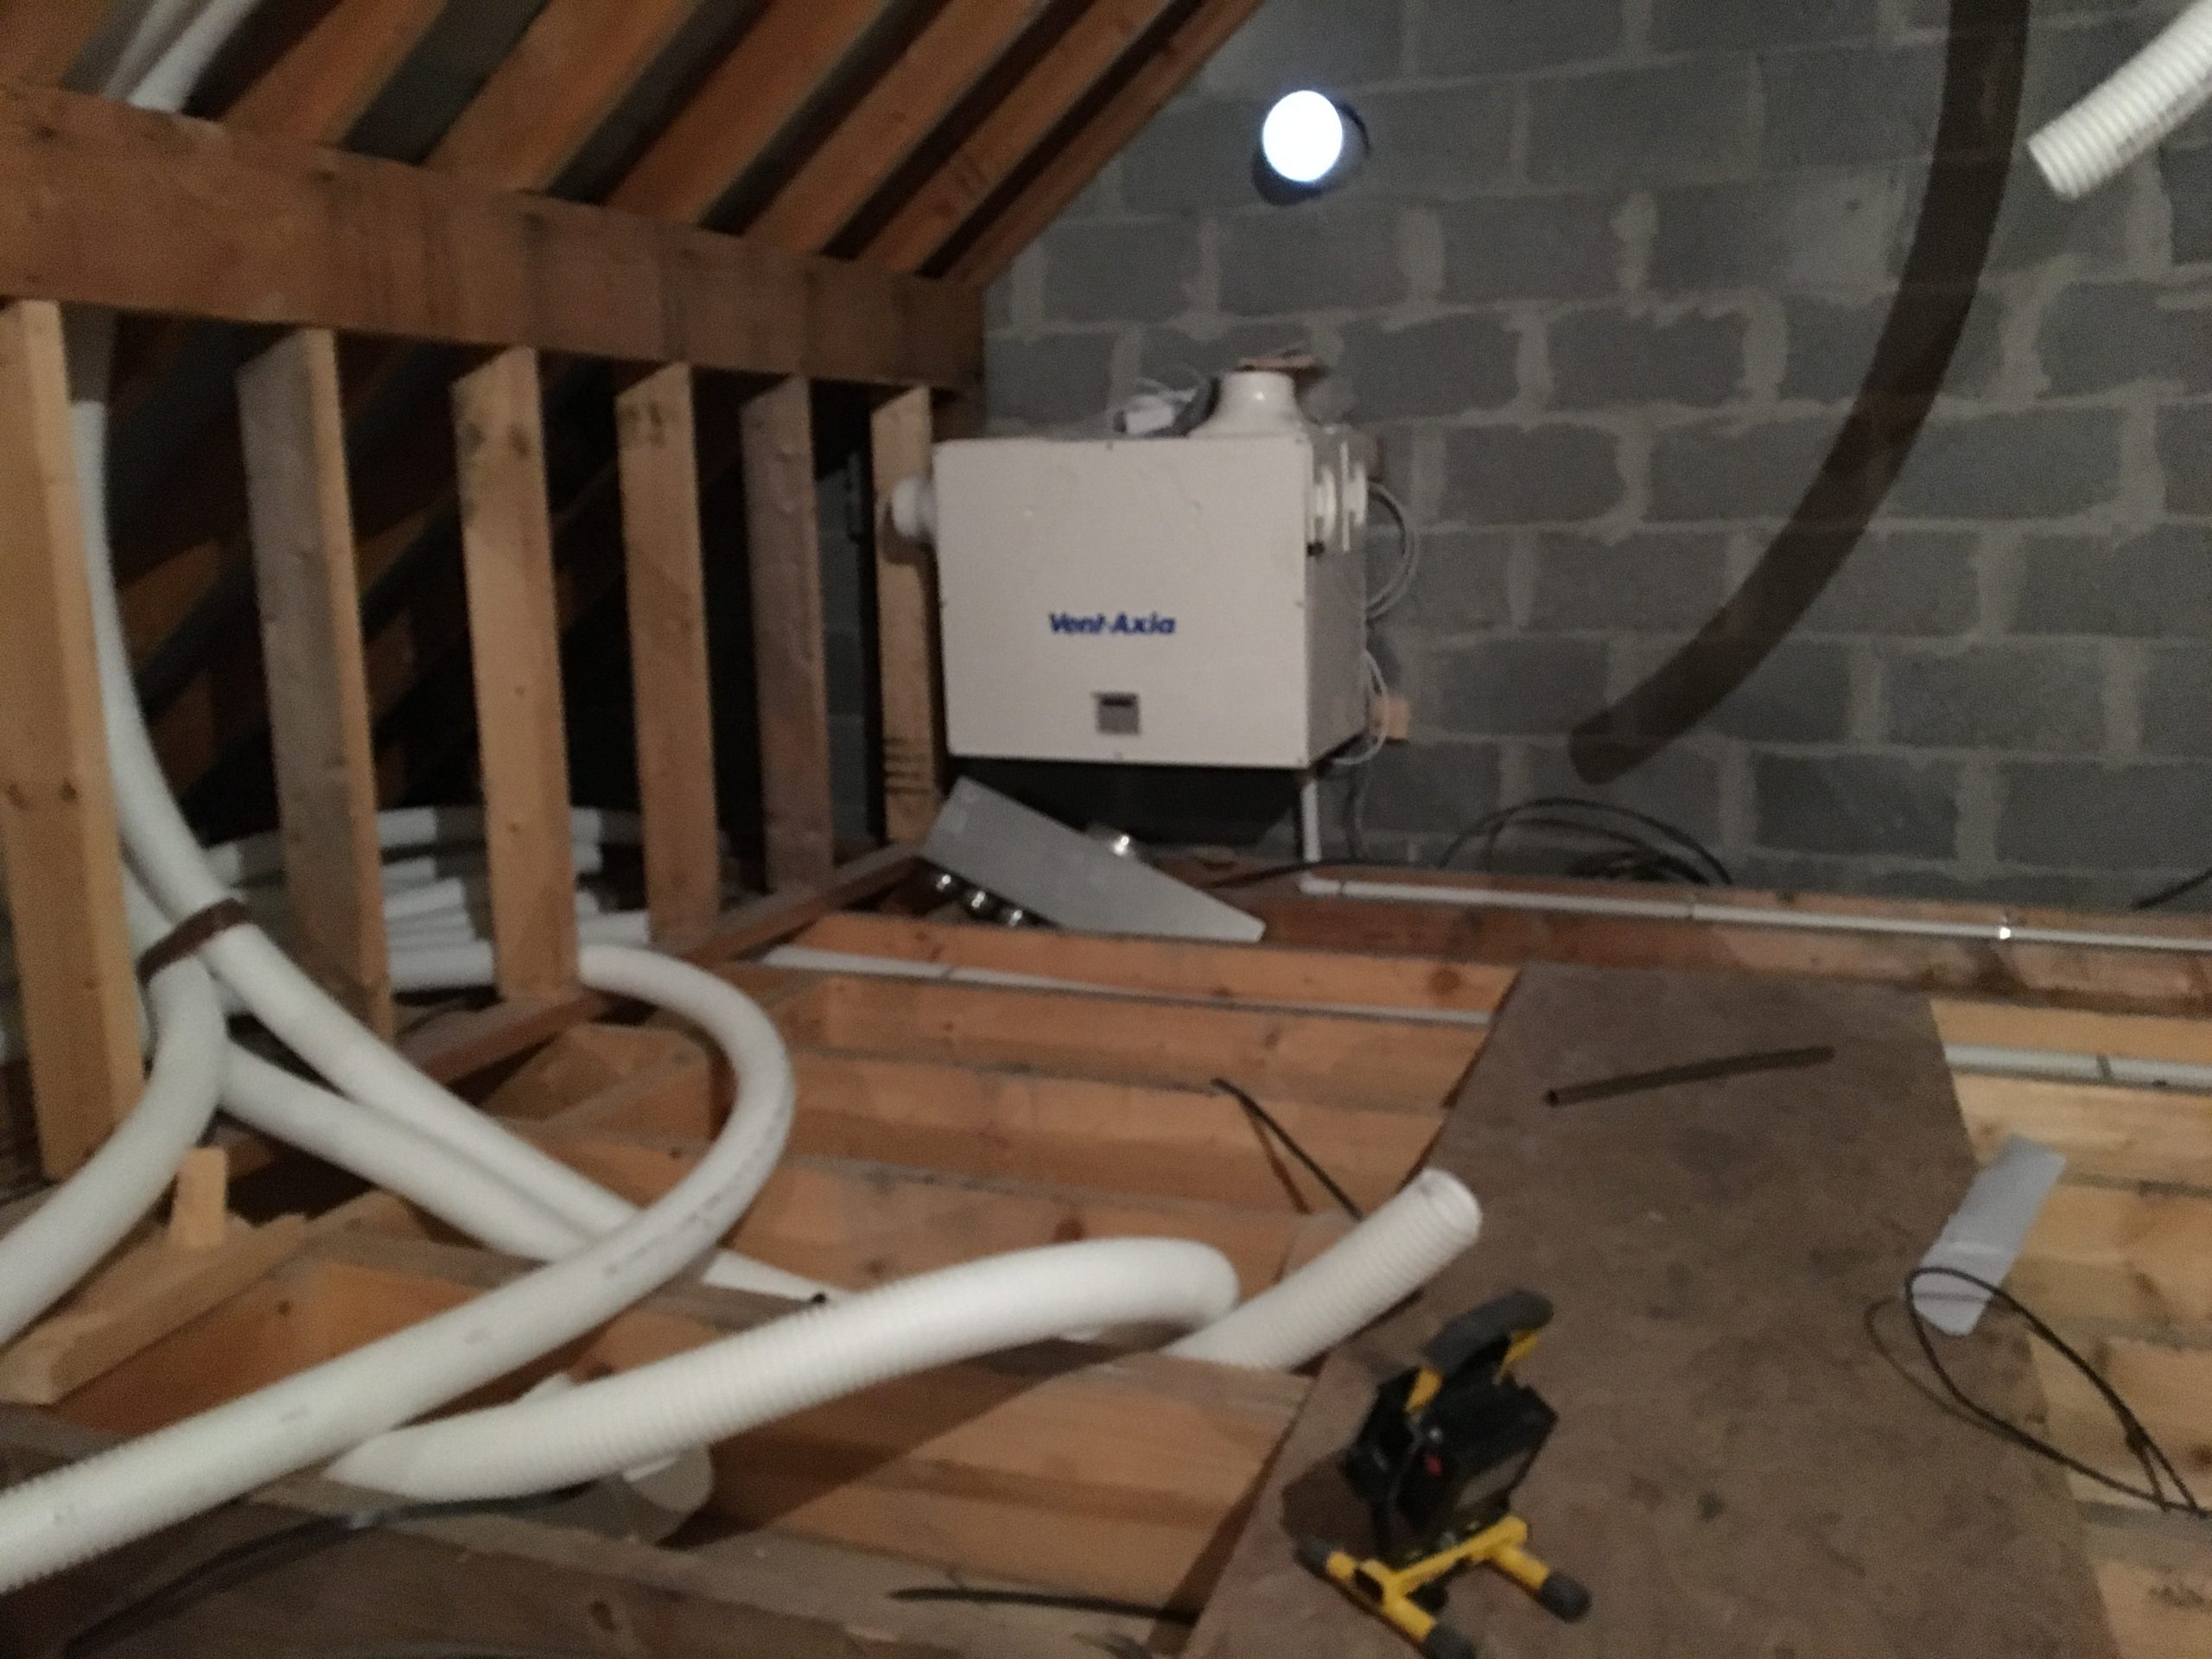
It was decided to install a Vent Axia Sentinial Plus B whole-house mechanical ventilation with heat recovery. This was installed in the attic and attached to the gable wall. This was a straightforward upgrade as the attic was empty. It was also decided to use solid duct pipes and run them in between the timbers. Insulation would be inserted afterwards or foam where they run up rafters, and that meant the ducting was hidden away permanently.
This also allowed all the external wall vents to be sealed up and closed to the outside in each room. The chimney was removed below the roof tiles to seal the house completely, and a virtual fireplace installed where the old fireplace was located. It is also important to note that it was not a design objective to make the house airtight. Closing all the major holes and vents to the outside was the objective. The cooker hood was exchanged for a cooker hood from a passive house. These don’t require a vented connection to the outside of the house.
These steps change the comfort of the house considerably. Remember you need to remove all the door saddles and any internal draft sealing as this system is now in control of the air in your home, and it needs to move freely.
This installation took 2 days to complete, and 98% of the work was in the attic space with little inconvenience to the homeowner.
Here is the updated DEAP dwelling report after step 2.
MHRV-dwelling-report
Here is the corresponding Part L report after step 2.
MHRV-part-l-report
Step 2 DEAP Result

- D2 Energy Rating
- Primary Energy = 269.94 kWh/year
- CO2 Emissions = 65.64 kgCO2/year
- EPC = 2.098
- CPC = 2.434
- RER = 0%
This is the new rating after installing cavity wall insulation, installing a whole-house mechanical heat recovery system, removing the chimney and sealing all the wall vents. These steps, 1 & 2, are now a D2 Energy Rating and will have life-changing comfort improvement in the home. For example, the house will no longer have drafts when you leave the internal doors open, and the rooms will all be the same temperature. Please note, individual room controls for heat will no longer control room temperature.
STEP 3. Attic Insulation.
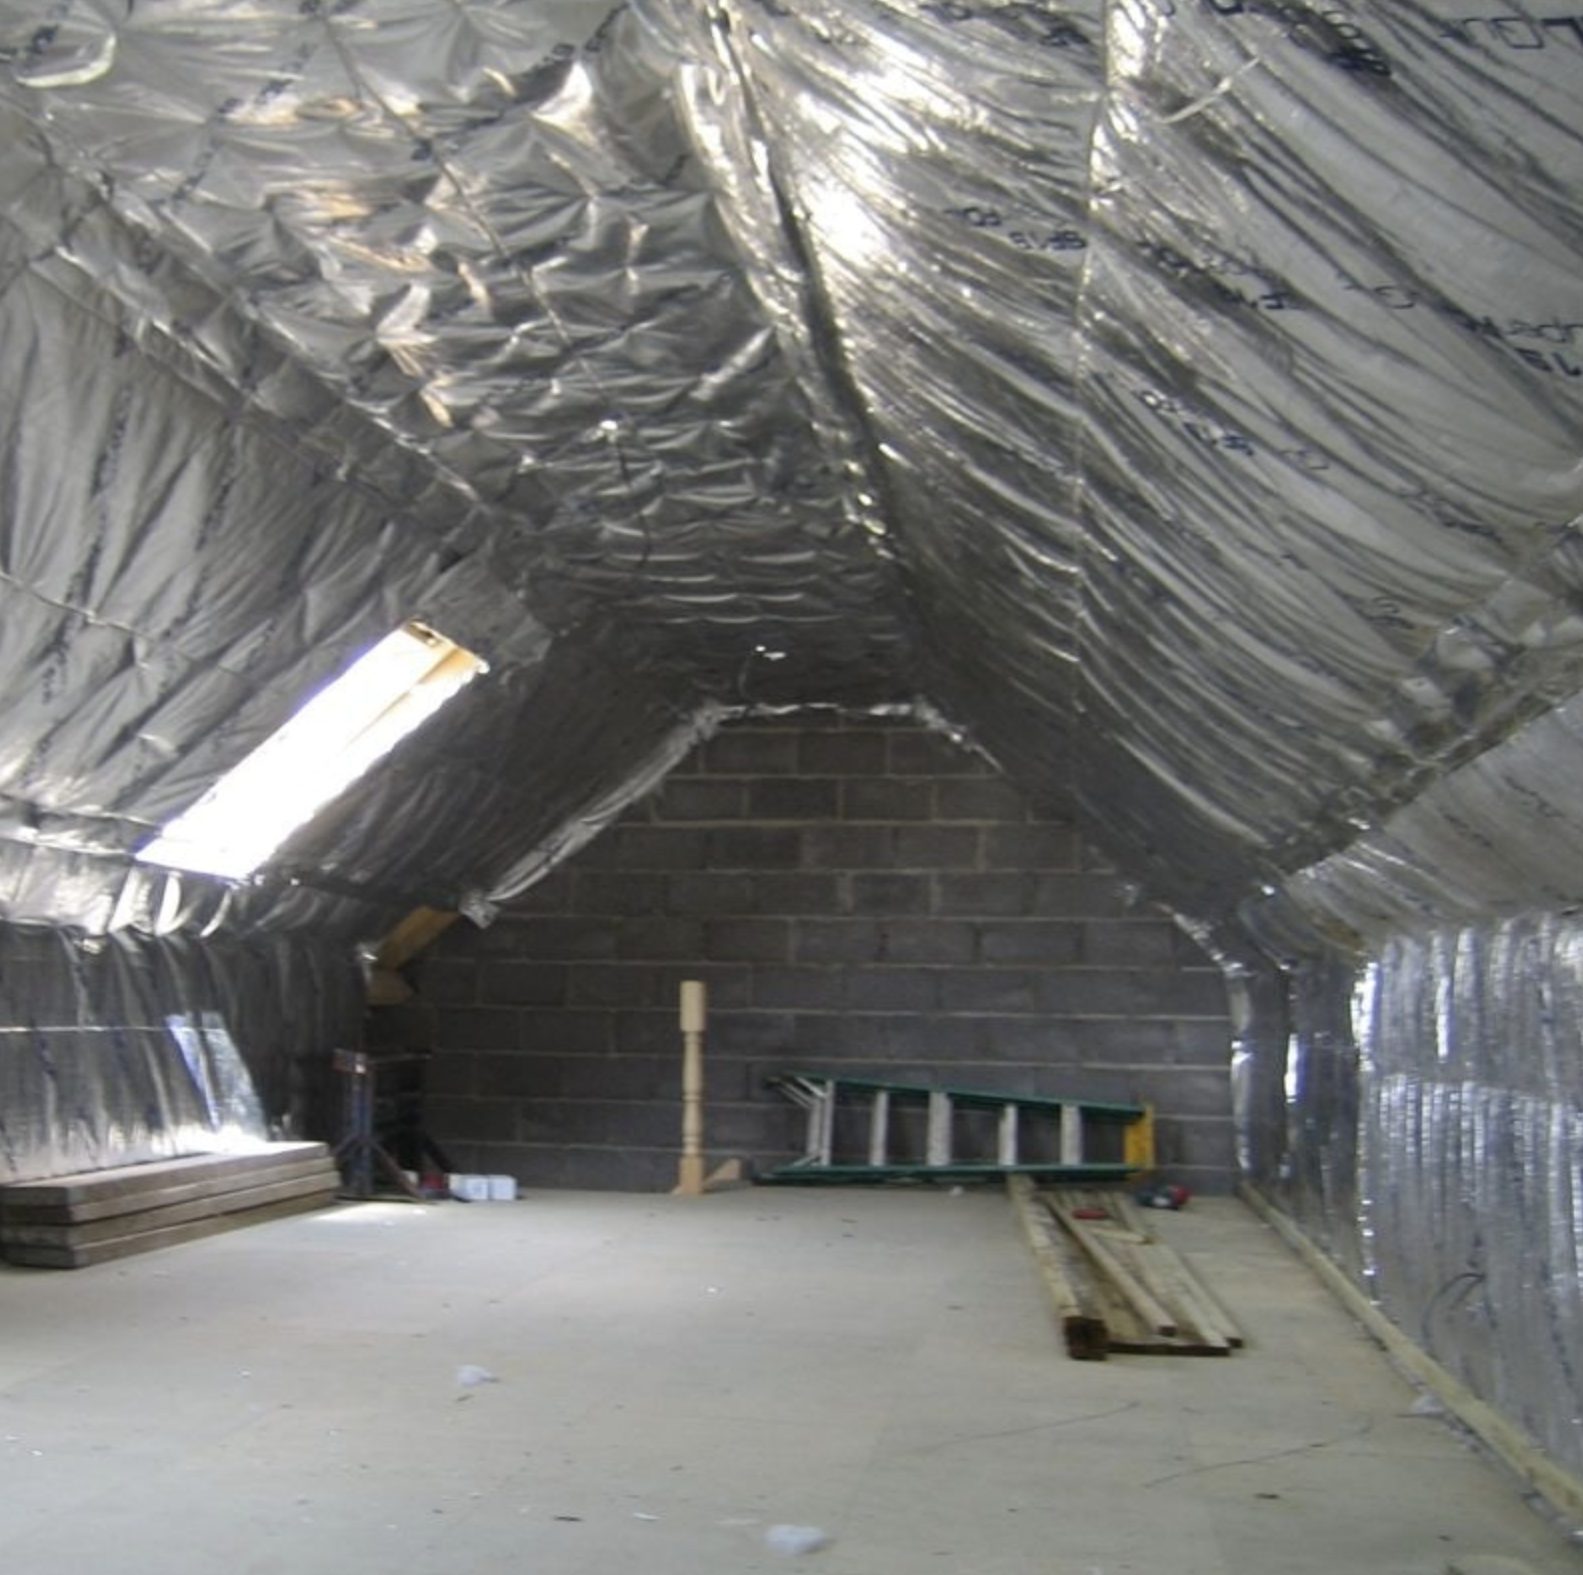
Now that ventilation has been addressed, we can now move to super insulate the attic space. In this house, it was decided to insulate on the rafters and make the upper attic airtight. This was done by foaming the rafters after installing a ventilation layer behind the foam. The foam was installed all the way down to the soffit to meet the floor insulation layer. The side attics were also insulated with rigid insulation.
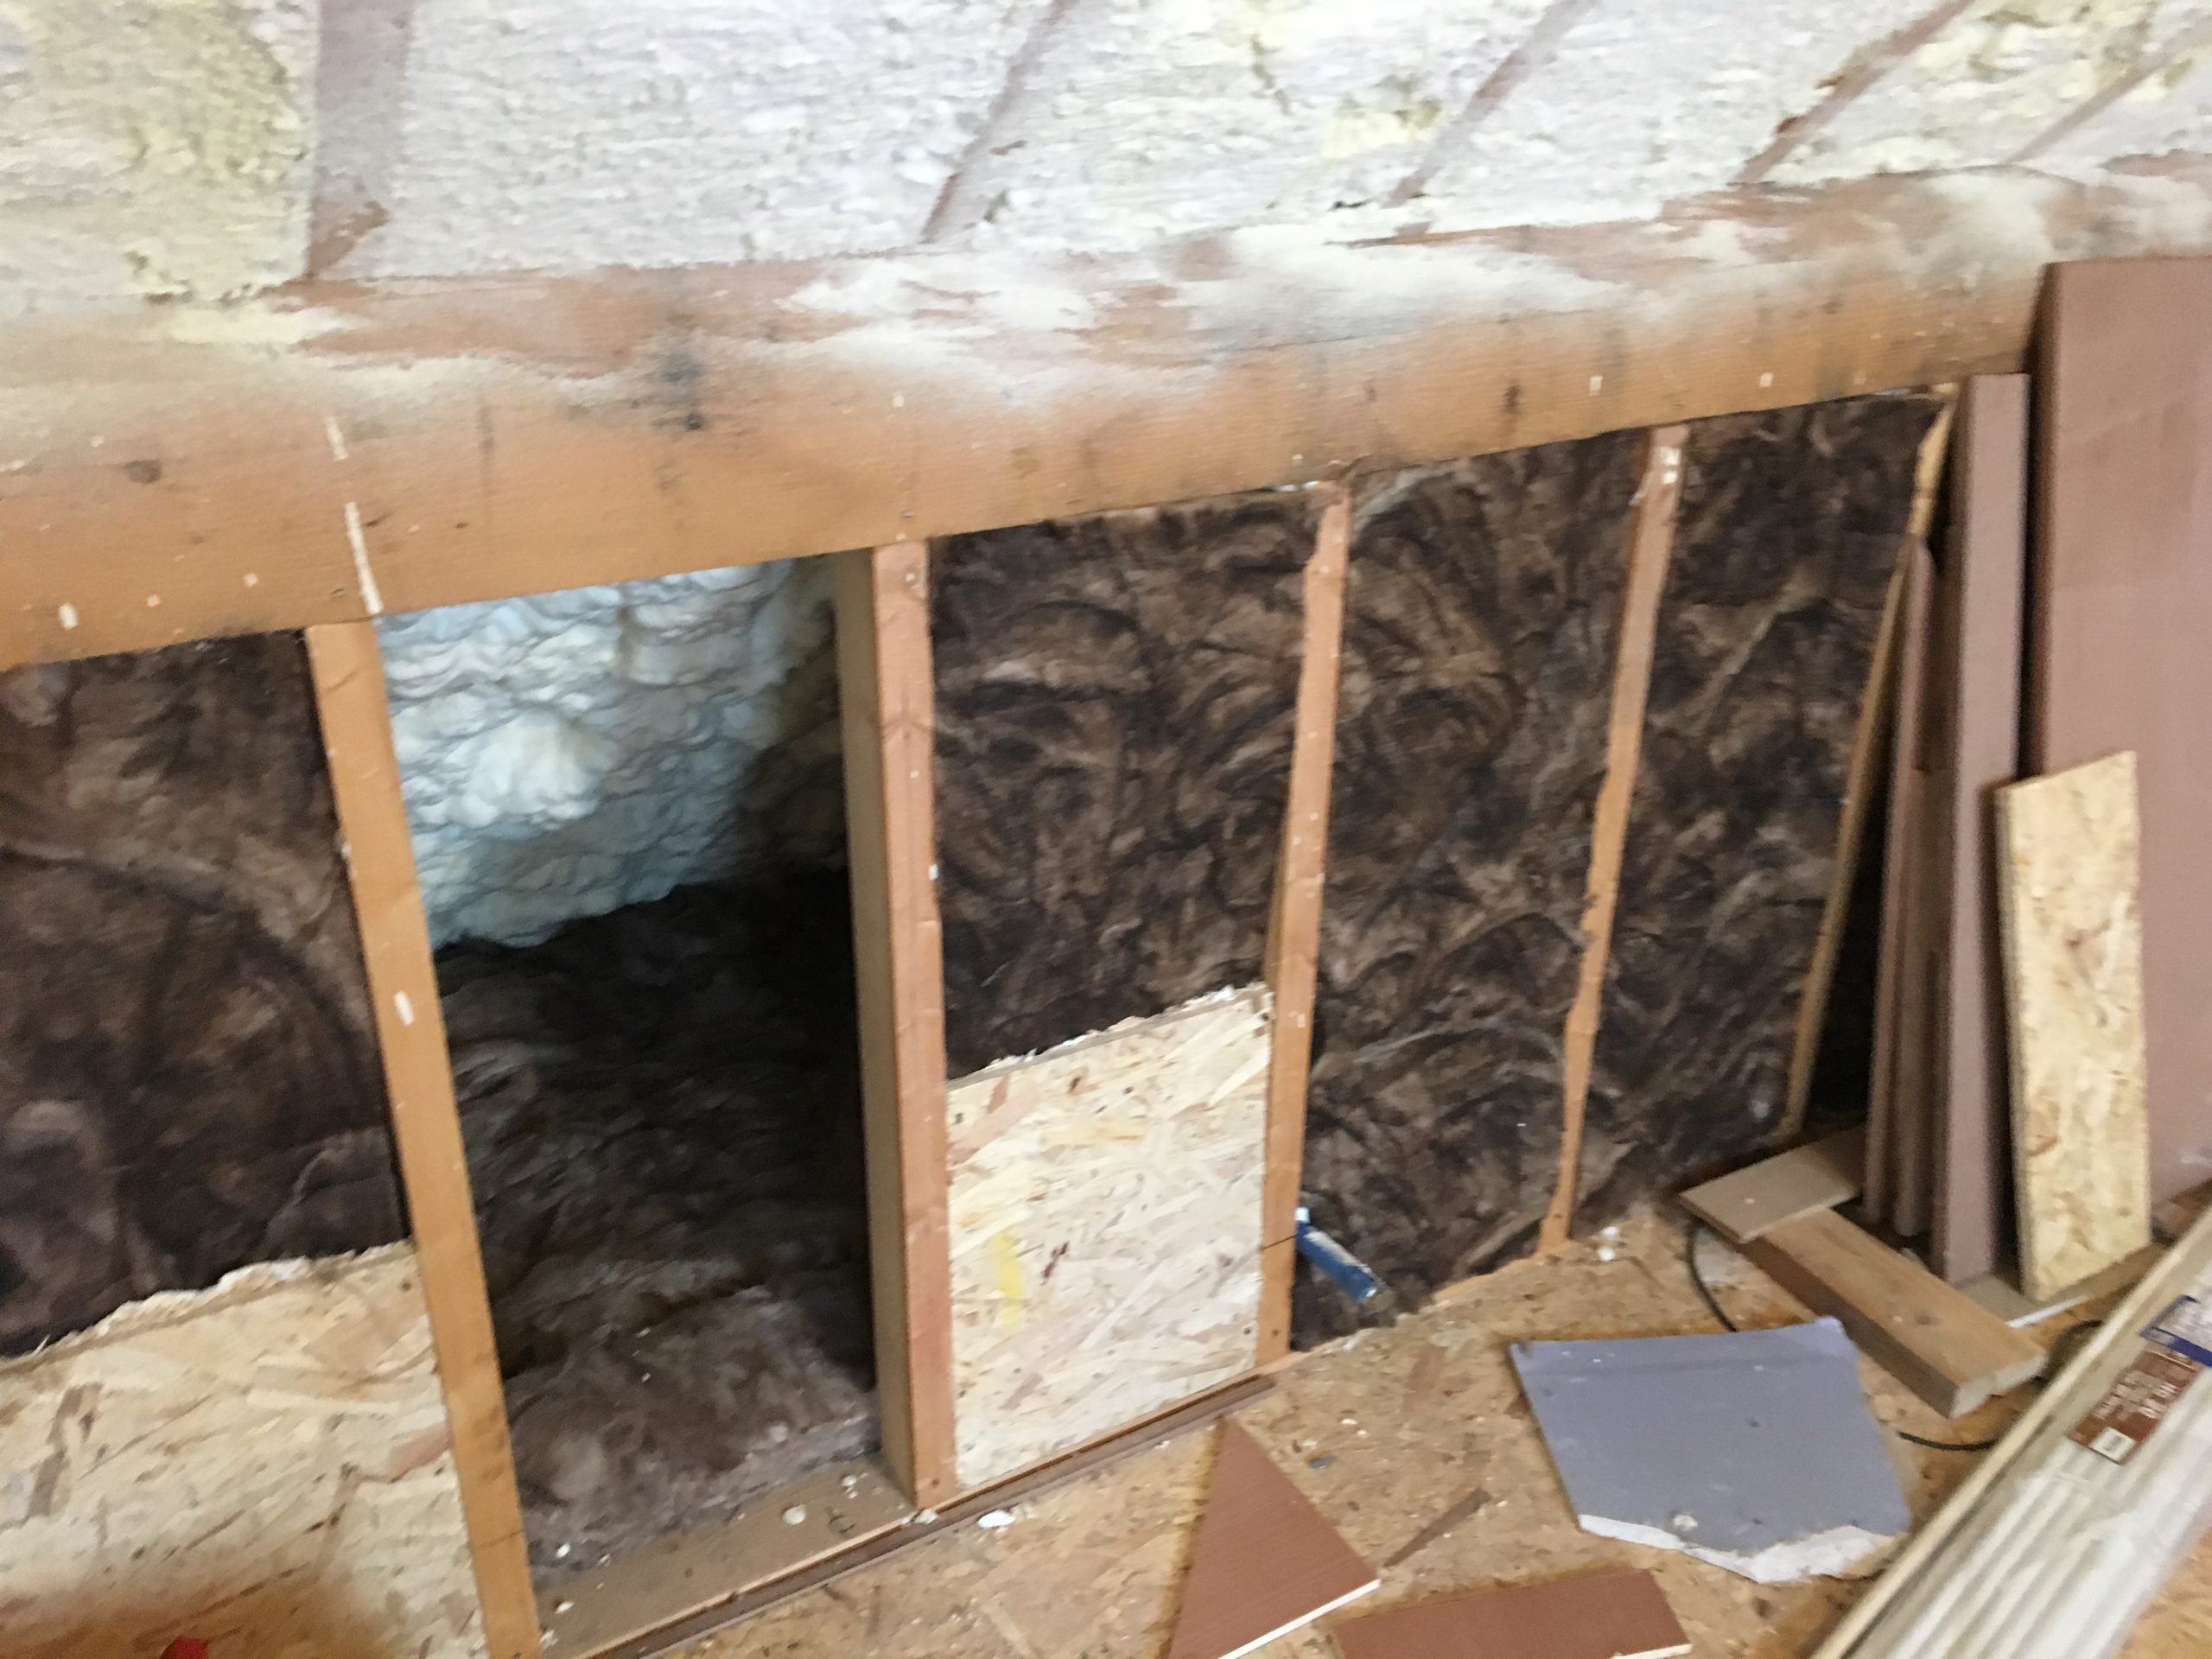
The attic then received a full layer of Superquilt which was taped to make the space airtight. This “tea cosy” insulation strategy stops/slows heat moving up the inner leaf concrete block to the attic and keeps the heat within the building, significantly reducing heating bills and delivering real comfort.
Note that if you ONLY insulate at the ceiling (which you should do as well), you cannot get airtightness as a bonus. Insulating on the rafter allows you to both insulate and make it airtight, a double bonus. This will give you a significant increase in comfort well beyond what you can achieve by insulating the ceiling only. In addition, it will also impact by lowering your heating bills significantly more than just insulating the ceiling insulation on its own.
In addition, the home has smart electric modulating panel heaters installed designed to keep the house at 21C from March to October using the homes free electricity during the day, which is soaked up by the inner leaf of the wall downstairs and released in the evening/nighttime back into the house. The tea cosy insulation methodology is designed specifically for that purpose. This keeps the house heated for free for months, and we will outline this in a later step.
The level of comfort in the home is now exceptional, with heating bills having collapsed with these 3 measures.
Also, note that the bare wall at each end of the attic was insulated with a 50 mm insulated plasterboard, and that was taped into the Superquilt multifoil blanket to create a full air-tight tea cosy.
Here is the updated DEAP dwelling report after step 3.
Attic-dwelling-report
Here is the corresponding Part L report after step 3.
Attic-part-l-report
Step 3 DEAP Result

- B3 Energy Rating
- Primary Energy = 134.70 kWh/year
- CO2 Emissions = 32.20 kgCO2/year
- EPC = 1.054
- CPC = 1.203
- RER = 0%
This tea cosy effect airtightness attic insulation upgrade is an ingenious, low-cost way of dealing with attic insulation from day one. It also leaves your whole attic warm and free for whatever use you may need. The resultant impact of this work is equivalent to 500mm of Rockwool insulation, not including the fact that it also airtight, not just insulated.
As a result, the house is now a B3 and very comfortable.
STEP 4. Low Energy Lighting.
Next, we address the lighting, and this was all changed to low energy CFL or LED, including the outside lighting. Again, this is a simple step.
Here is the updated DEAP dwelling report after step 4.
light-dwelling-report
Here is the corresponding Part L report after step 4.
light-part-l-report
Step 4 DEAP Result
- B3 Energy Rating
- Primary Energy = 130.59 kWh/year
- CO2 Emissions = 31.57 kgCO2/year
- EPC = 1.022
- CPC = 1.180
- RER = 0%
The lighting is all LED with some CFL. There is no shortage of low energy lighting options available in the market, and most options require you to choose a low energy light bulb next time you replace an existing light bulb. The rating has edged down only a small bit, and it is still a B3 Energy Rating.
Again, people expect this measure to impact your energy rating, but it has little impact. If your old-style lightbulb produces 10 watts of light and 40 watts of waste heat, switching to an LED lightbulb that produces only 10 watts of light and no waste heat means you have to increase your heating to replace this heat, hence little benefit in your energy rating.
STEP 5. New Small Micro Boiler.
Now that the heating requirement is significantly lower, the original external standard 45 KW oil boiler was upgraded to a new wall hanging micro 12 KW condensing oil boiler and hung inside the utility cabinets to keep it out of the way.
This boiler was installed inside as homes upgraded with HONE systems typically have boilers switched off for 10 months of the year. Having the boiler inside the warm utility press keeps it out of the elements. This was a simple upgrade.
The boiler itself is 1.5 times the size of an iPad to highlight how small the boiler block is. This is why it has to be hung on a wall, and it is also 94.9% efficient. (keep in mind, you could use gas as well, but you will have a monthly gas supply charge), both kerosene and gas have the lowest CO2 emissions of any fuel, 3 times lower than electricity, for example.
This upgrade only took half a day.
Here is the updated DEAP dwelling report after step 5.
boiler-dwelling-report
Here is the corresponding Part L report after step 5.
boiler-part-l-report
Step 5 DEAP Result

- B2 Energy Rating
- Primary Energy = 119.31 kWh/year
- CO2 Emissions = 28.78 kgCO2/year
- EPC = 0.934
- CPC = 1.076
- RER = 0%
This new boiler is small and quiet and will only be required in winter; the new heating cost will be discussed at the end.
The home only had one boiler zone, which was heating & hot water on together. This has been changed by adding a Climote 3 channel boiler controller, which can be operated by smartphone app. The main room control stat is in the hall and connects to the Climote remotely. This limits the boiler once the rooms are meeting temperature. Heating & Hot Water are now separate zones. This was an easy upgrade that only required an hour.
It is important to note that as the home now has whole-house mechanical heat recovery, only one room stat is required per floor. This is typically installed in the hallway.
STEP 6. Windows.
This step is really important especially if you have bought a secondhand home but you should check this in any case or you could waste thousands of euros !
This house had poor windows in the Building Energy Rating supplied with the sale. Unless you have the actual paperwork for the windows from the manufacturer, the BER Assessor will insert them into the DEAP calculation as a “default” window value based on the age of the house. Default values are not good values.
Make sure you investigate if you can get the window paperwork. This can cause problems as it may look like the home has poor windows and cause them to be upgraded completely unnecessarily. If you have double glazing, you need to look inside the glass onto the metal strip between the panes of glass. There will be a batch number and possibly a date. If you don’t know who manufactured your windows, then ring around; there are few suppliers, so ask them if they recognise your code. It is a worthwhile exercise that could save you thousands. Note: the batch code is not on every window, but it will be on one or more somewhere.
Even if your windows were installed 25 years ago, they would send you the paperwork confirming the technical data.
This is exactly what was done in this project, and the initially poor windows that looked like they should be upgraded were perfect quality windows with low-E glass with a soft coat. Without that information, they would have possibly been replaced for no reason and at a high cost. Note: there is no benefit to installing triple glazed windows in any house other than passive unless it is a roof window.
NOTE: The correct double glazed windows will get a better energy rating than triple glazed windows. Triple glazed windows increase your heating bills !!.
Windows do two things, they stop your heat from going out and they let in solar gain which is free heat that warms your home during the day. Double glazed windows do both jobs very well and triple glazed windows tend to block all the free solar gain thus increasing your heating bills. Triple glazing should only be used for heat rejection (overheating) where this issue will be a problem.
STEP 7. HONE Heat, Power & Drive.
Next to get installed is a HONE Heat, Power & Drive system. This system integrated with the central heating, hot water and electricity systems of the house.
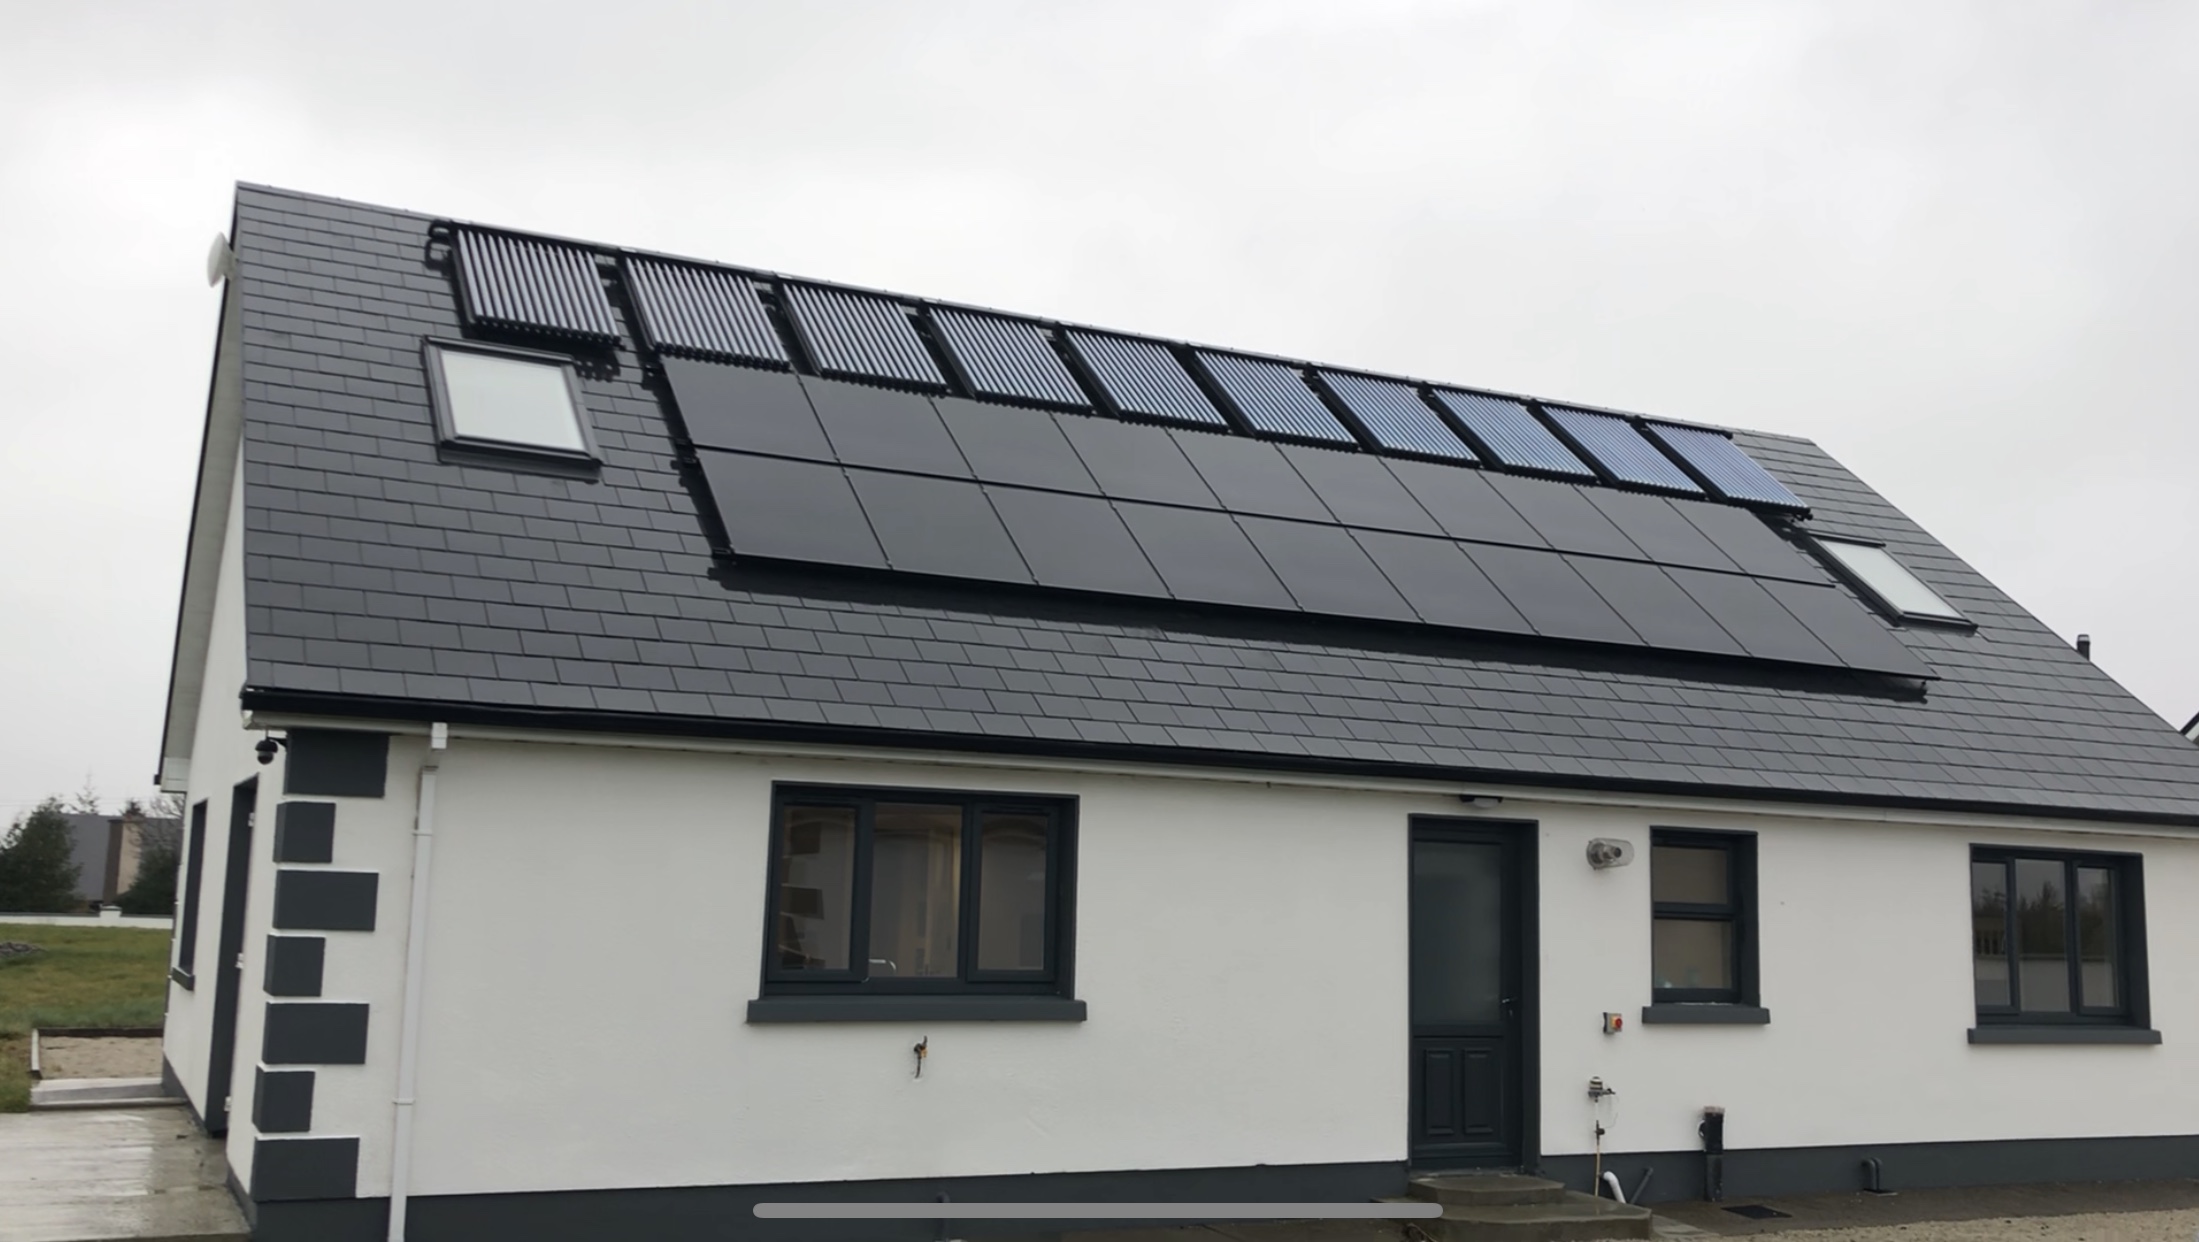
This is what it looks like outside. On an unrelated note, the walls were painted white. The original white framed aluminium/uPVC windows were spray painted with a special coating for changing the colour of windows to modern gunmetal grey.
The top row of ten are panels are 10 x HONE Thermal/Electric panels that produce both heat & electricity, currently the worlds most powerful Thermal/Electric renewable panel technology with a certified output of over 7 times more kWh than Solar PV per sqm.
The second row of 10 panels provides power for the house, and the third row is power for an EV (electric car); however, that EV power also gets used in the house and runs modulating smart heaters. HONE electric panels historically provide 950 kWh/ KW(p) installed in this location.
The Thermal portion of the system connects to the central heating system and hot water system. This provides energy for the radiators and hot water system.
THE FINAL RESULT.
To analyse the new heating bill situation (if you cannot read the DEAP information), the original heating load at E1 was 52,787 kWh per year. With every litre of kerosene having just over 10 kWhr of energy, this would equate to 5,287 Litres of Kerosene or €3,167 in annual cost. In addition, the hot water load was 4,754 kWhrs in the original E1, which would be an additional €285 totalling €3,452 in Kerosene per year.
With the new A2 Energy Rating, the new heating bill at 11,738 kWh per year will cost €704.28, and the hot water bill will cost €107.46 extra for the year.
However, the house will also make 4,740 kWh worth of free electricity. If 50% of that free electricity charges an EV (15,800 km free EV travel annually) and 50% of it runs the smart heaters during the day, this will be worth €2,137 in savings annually.
In addition, that free smart heater usage will drop the heating bill from €704.28 down to roughly €300 per year. The HONE system will provide up to 90% of the annual hot water, so the hot water bill is low.
This part of the install with the HONE Thermal/Electric system takes 3 days and is done concurrently alongside the insulation upgrades.
This means the annual heating bill has dropped by nearly 91% with these measures.
The TOTAL annual saving of ALL the works completed adds up to €5,289 in year one with savings in heating,hot water, electricity & petrol costs avoided.
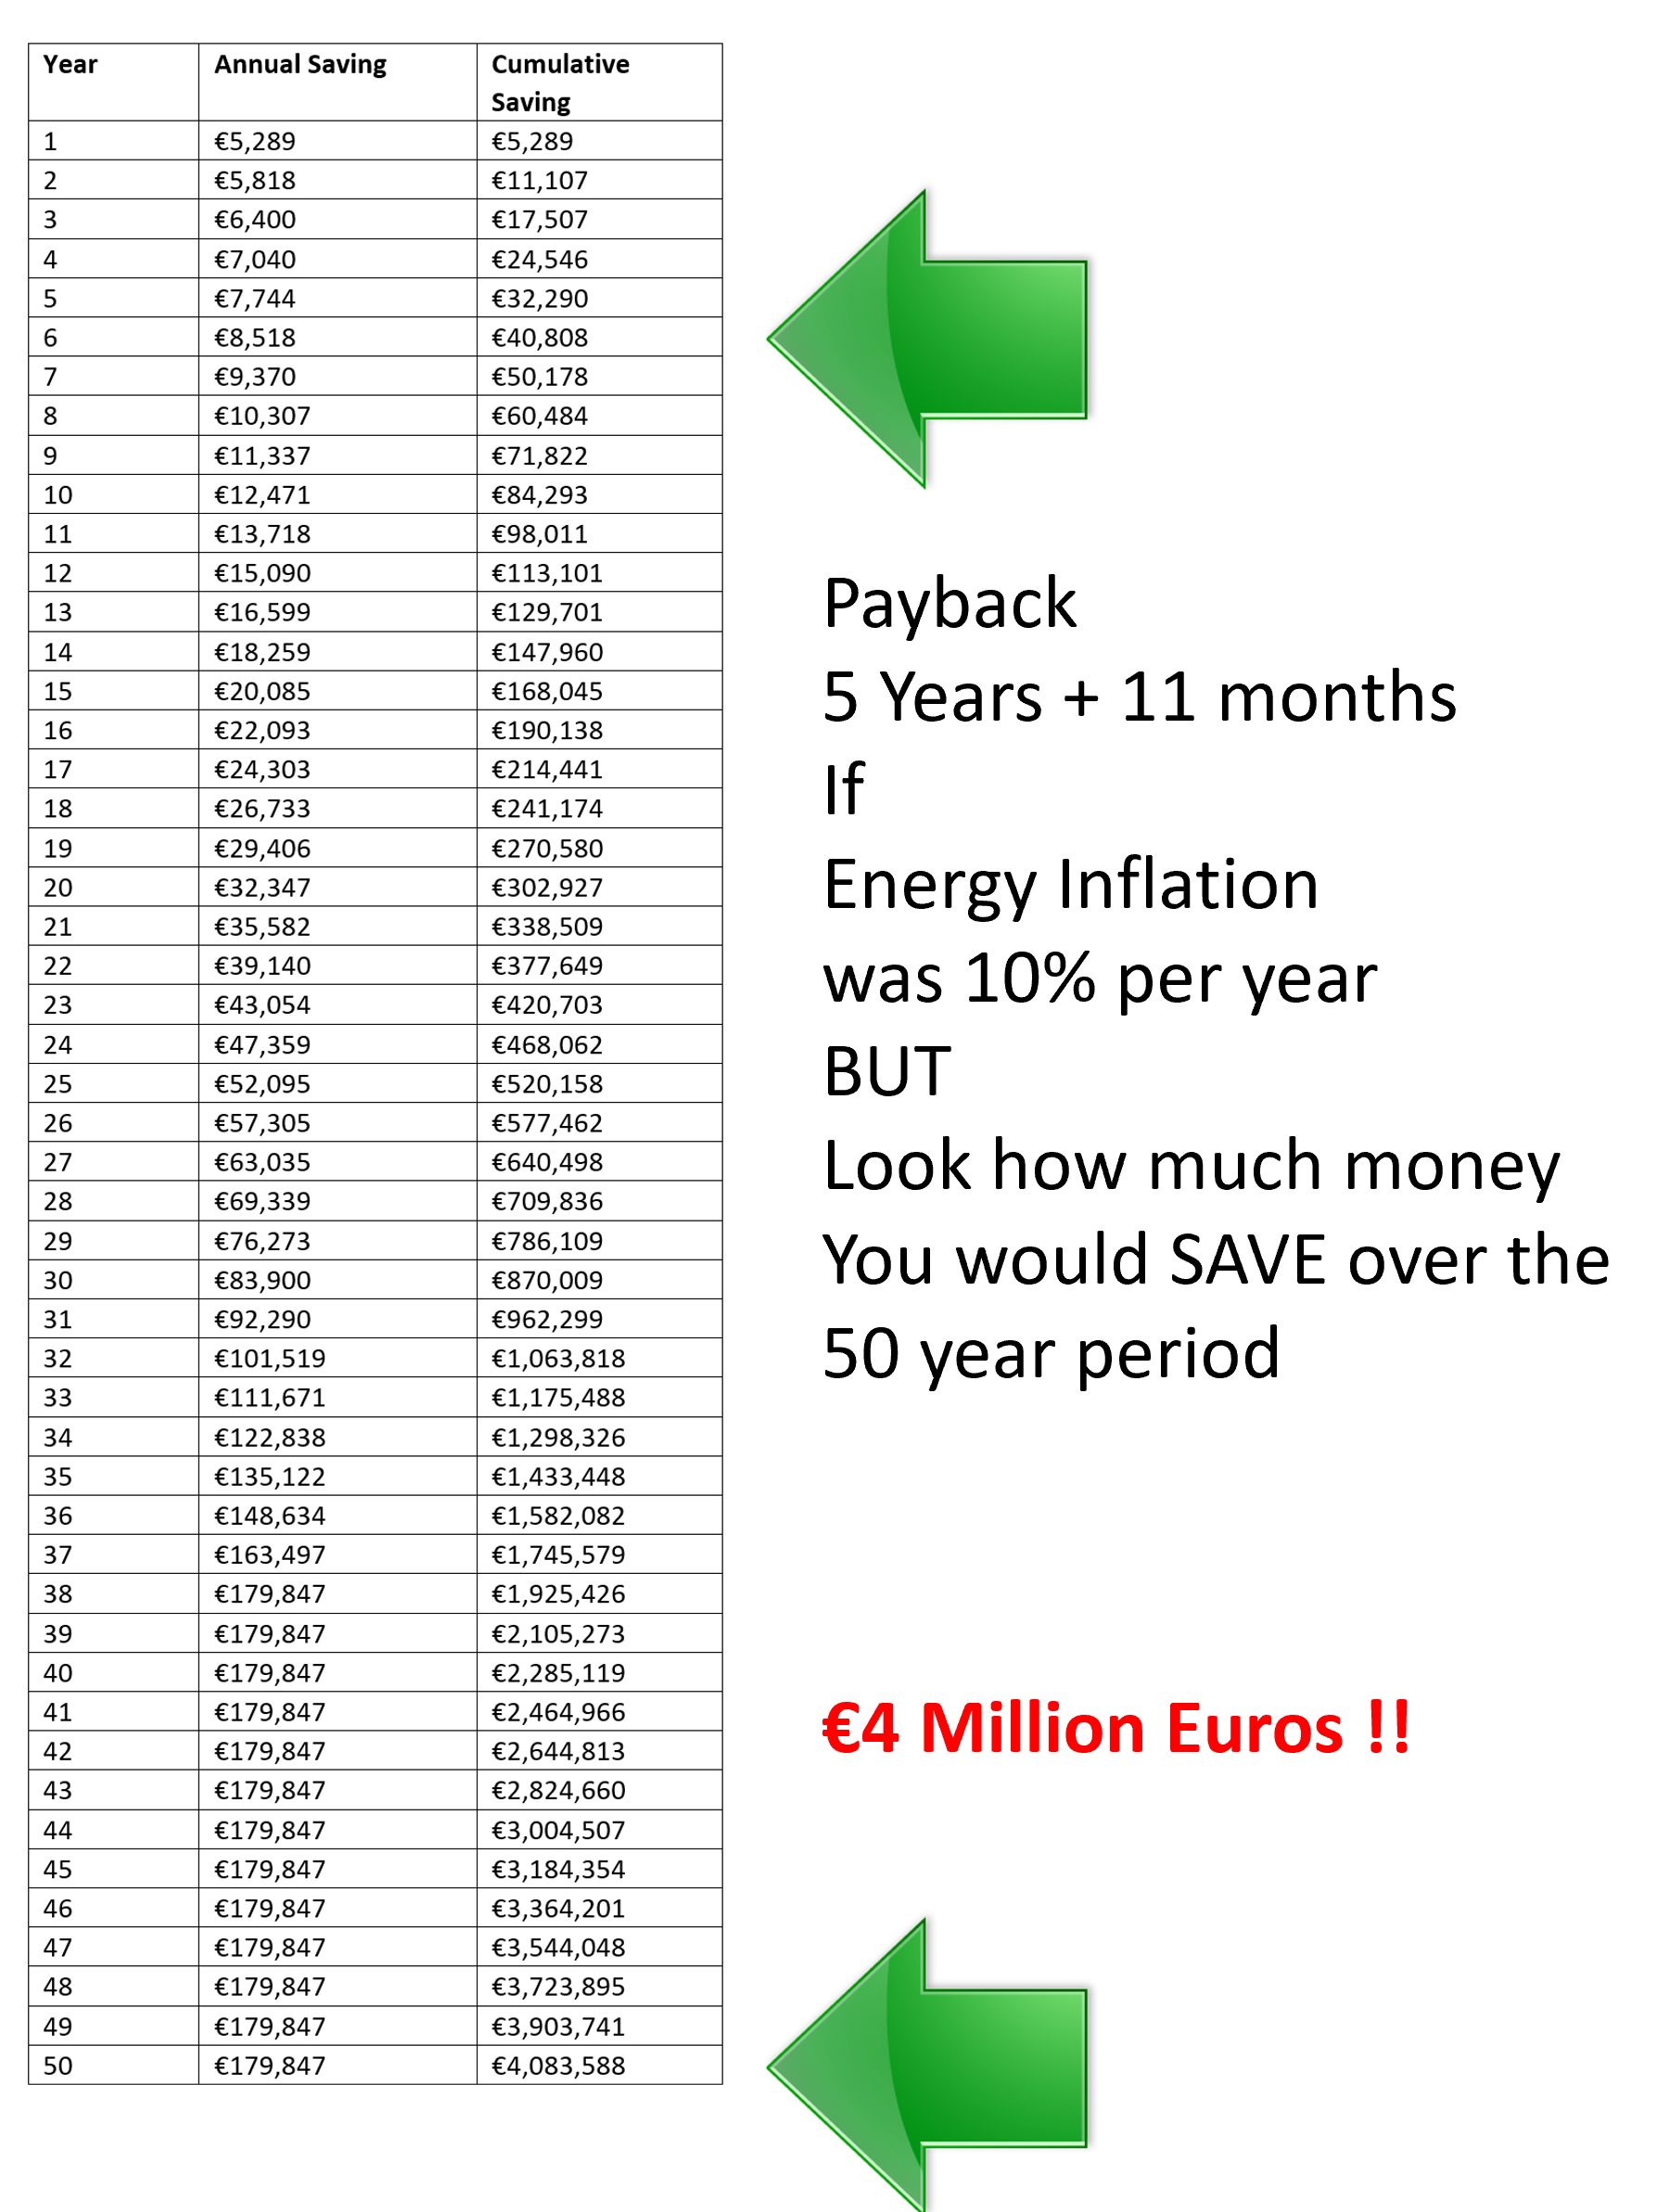
Over the next 30 years it will save €251,626 at 3% annual inflation, or €555,251 saved over 50 years.
Note: By July 2021, energy inflation has already hit 12% since Jan 1st.
To work out the financial return of the system, we use a minimum inflation figure of 3% as energy inflation is always a lot higher than this, and you can see payback is achieved in 6 years and 11 months with substantial future savings and an ultra-modern comfortable home.
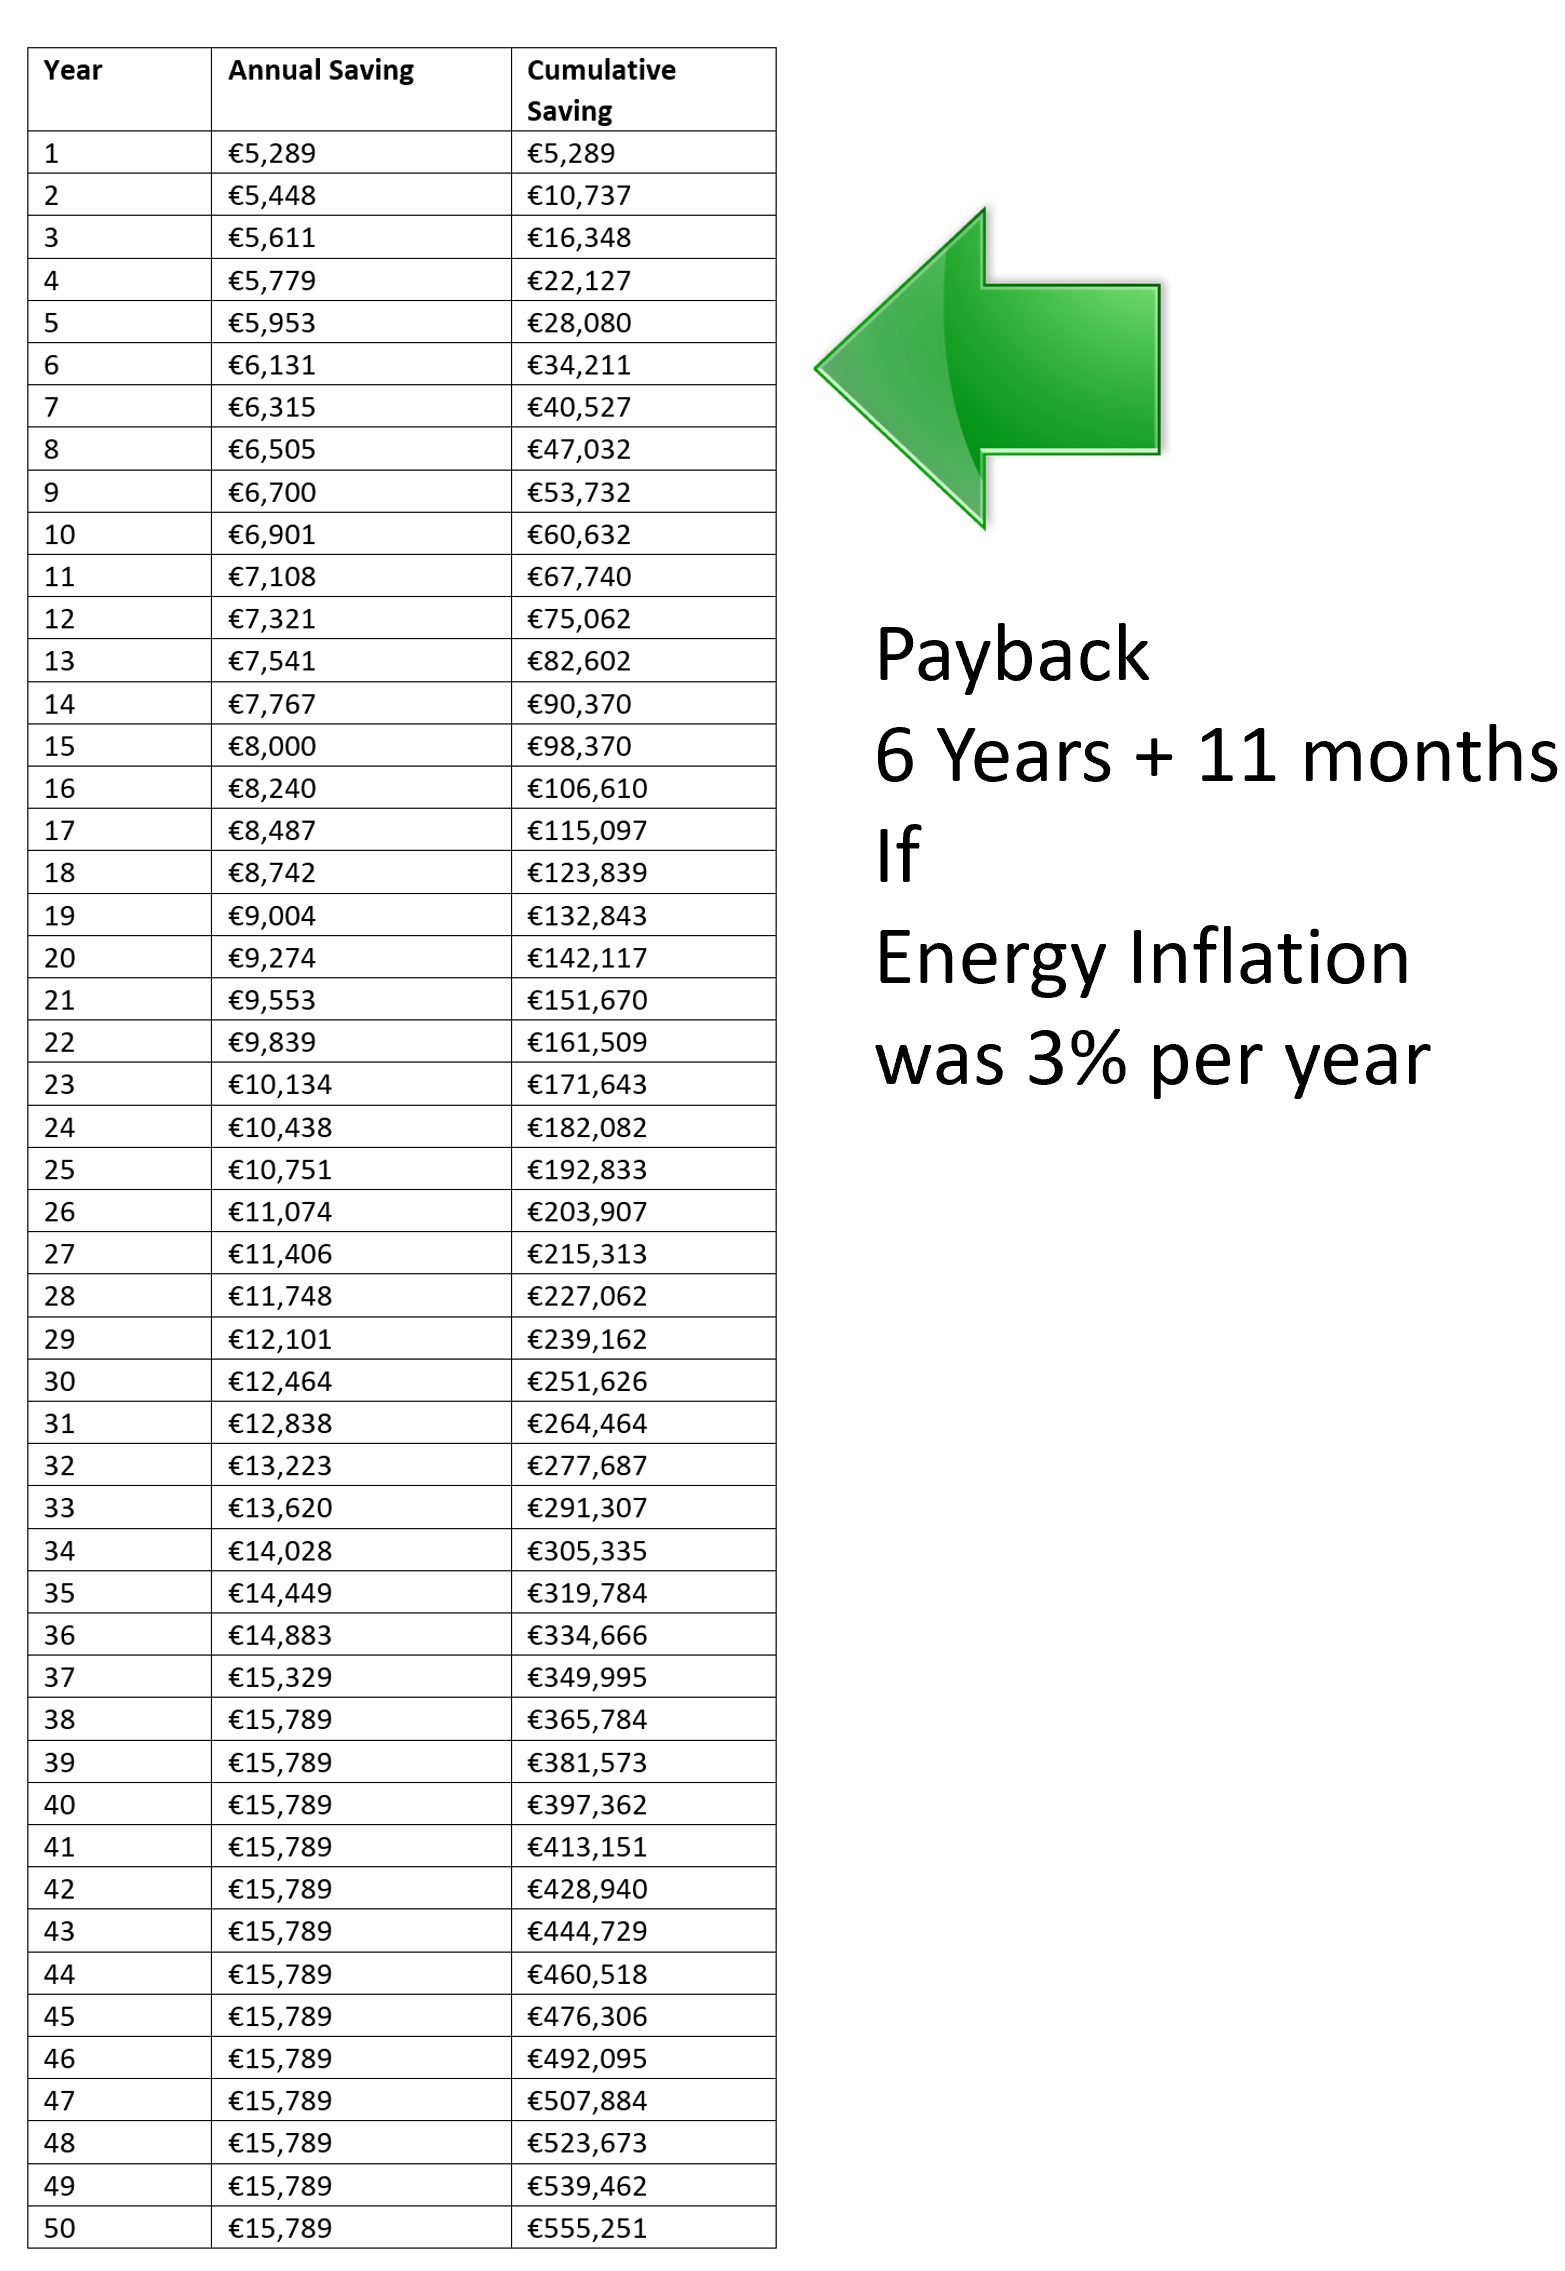
As of July 2021, annual energy inflation for the first 6 months is already at 10% in Ireland, see what happens to your savings potential below if energy inflation was 10% every year. We know it will be higher than 3% and it won’t be 10% every year but somewhere in between.
Here is the updated DEAP dwelling report after step 7.
Final-A2-dwelling-report
Here is the corresponding Part L report after step 7.
Final-A2-part-l-report
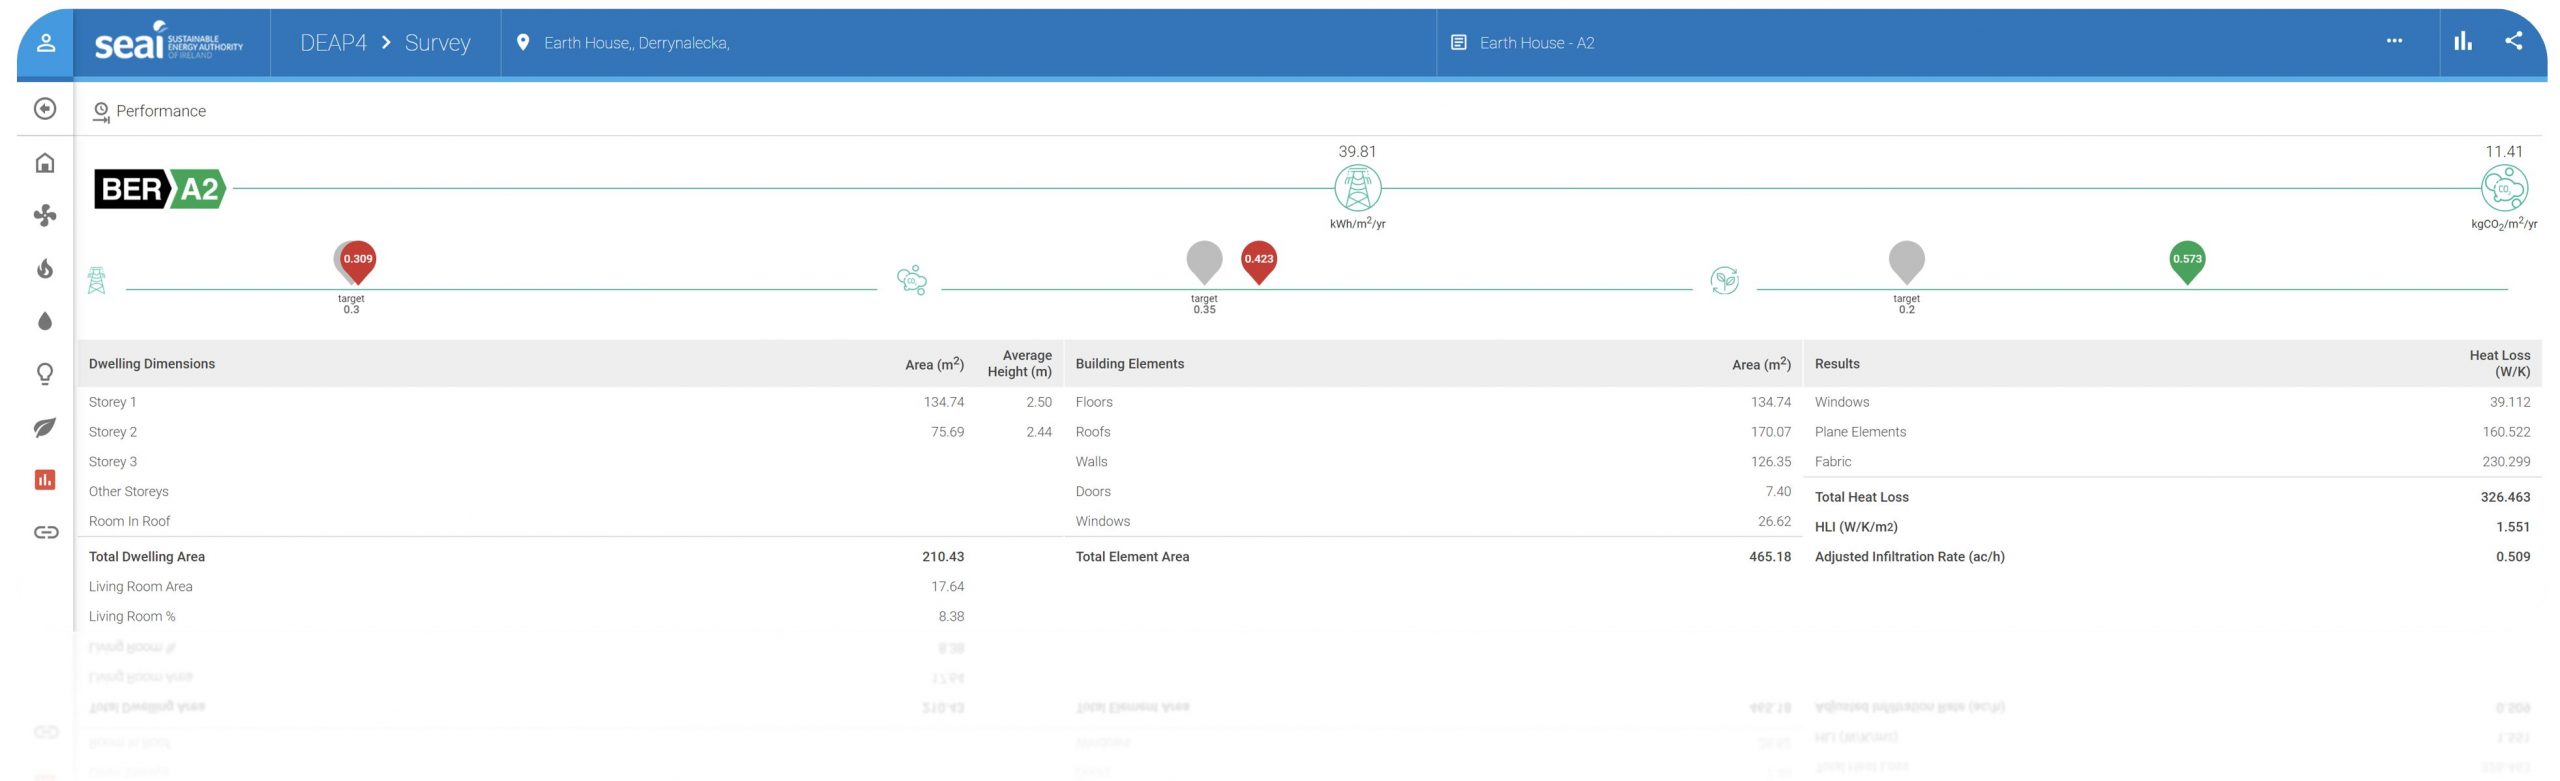
Step 7 DEAP Result

- A2 Energy Rating
- Primary Energy = 39.81 kWh/year
- CO2 Emissions = 11.41 kgCO2/year
- EPC = 0.309
- CPC = 0.423
- RER = 57.3%
The house is now a superb A2 Energy Rated home exceeding the performance of a brand new nZEB house built in 2021.
This is the new A2 energy rating certificate at the finishing point.
Part L Outcomes.
In the beginning, we stated that no Part L requirements were required for this house due to its age but that we would turn on full nZEB 2021 Part L compliance to see how the upgrades compared to a brand new house. The following detail is that analysis.
Part L measures 3 requirements.
- Energy consumption that is no greater than 30% of the energy of a 2006 model home. (EPC less than 0.3)
- CO2 Emissions that are no greater than 35% of a 2006 model home. (CPC less than 0.35)
- A renewable energy ratio minimum target for the home. (RER = 20% of Primary Energy)
Below is the Part L screenshot (click to enlarge) of the existing E1 house before the upgrade, and remember the house was not built in 2021, so it does not have to meet these standards.
- The existing home was using energy 8.37 times more energy than a new build 2021 nZEB home. (EPC = 2.51)
- The existing home was producing 8.95 times more CO2 emissions than a new build 2021 nZEB home. (CPC = 3.13)
- The existing home-produced zero renewable energy, which is 20% of PE in a new build home. (RER = 0%)
Below is the Part L screenshot (click to enlarge) of the final upgrade energy rating A2 of this project.
It is impossible to expect an existing home to meet some of the new regulations such as cold bridging, U-Values or floor insulation as this would require you to rebuild parts of your home.
But it is interesting to see how successful this simple retrofit upgrade has been.
- The existing home now uses 1.03 times more primary energy than a new build 2021 nZEB home, virtually meeting the 2021 standard. (EPC = 0.309)
- The existing home now produces 1.2 times more CO2 emissions than a new build 2021 nZEB home, so it is only slightly above the new 2021 standard. (CPC = 0.423)
- The existing home now produces 57.3% renewable energy, 37.3% greater than a new build 2021 nZEB home, far exceeding the new standard. (RER = 57.3%)
The result is a fabulous house prepared for the next 50 years with very low energy bills and exceptional warmth and comfort levels. The project was completed with little homeowner inconvenience and over 5 days.
Smart Heaters.
We mentioned WiFi smart electric heaters. Here is a video highlighting one. These heaters modulate, 10 secs on/10 secs off, but they give heat all the time they are turned on. They have their own time and temperature control and are controlled by a smartphone app where you set parameters, schedules and forget about them.
While running during the day, your walls soak up the free energy and release it at night, keeping your house warm totally free for up to 10 months of the year.
The big bonus is that they run from your own free electricity and this means that to heat up certain rooms, home office, etc during the day, you no longer need to heat the whole house and rooms you are not using.
Planning your project.
The great thing about an upgrade plan is that you can design all the measures and even see the final result before you start.